Google Photos is the go-to photo management app on most Android devices. The app automatically syncs your pictures across connected devices. Once you connect the app to a default Google account, you can view your gallery online from your Android tablet.
Google Photos has many helpful features. You can create animations, collages, and highlight video creations. But to help spark some newfound creativity, we’ve rounded up the best ones to outline the app’s full potential.
Related
Google Photos: Everything you need to know
Meet the Swiss Army knife of gallery apps
Download older photos if you’re running out of Google Photos storage
Having a local copy of your images ensures you don’t lose them if something unexpected happens to your Google account. Plus, you can access them without an internet connection, which is useful in an area with limited or no connectivity.
The Google Photos app lets you download images one at a time. Use the web version if you need to download multiple pictures. Follow the steps below to download your pictures from the app or web version of Photos.
The steps in this guide work on the Google Photos app for Android and iOS. We use the Android app for this tutorial. iPhone users can follow the same steps.
Download images on the Google Photos app
- Open the Photos app.
- Tap an image to open it.
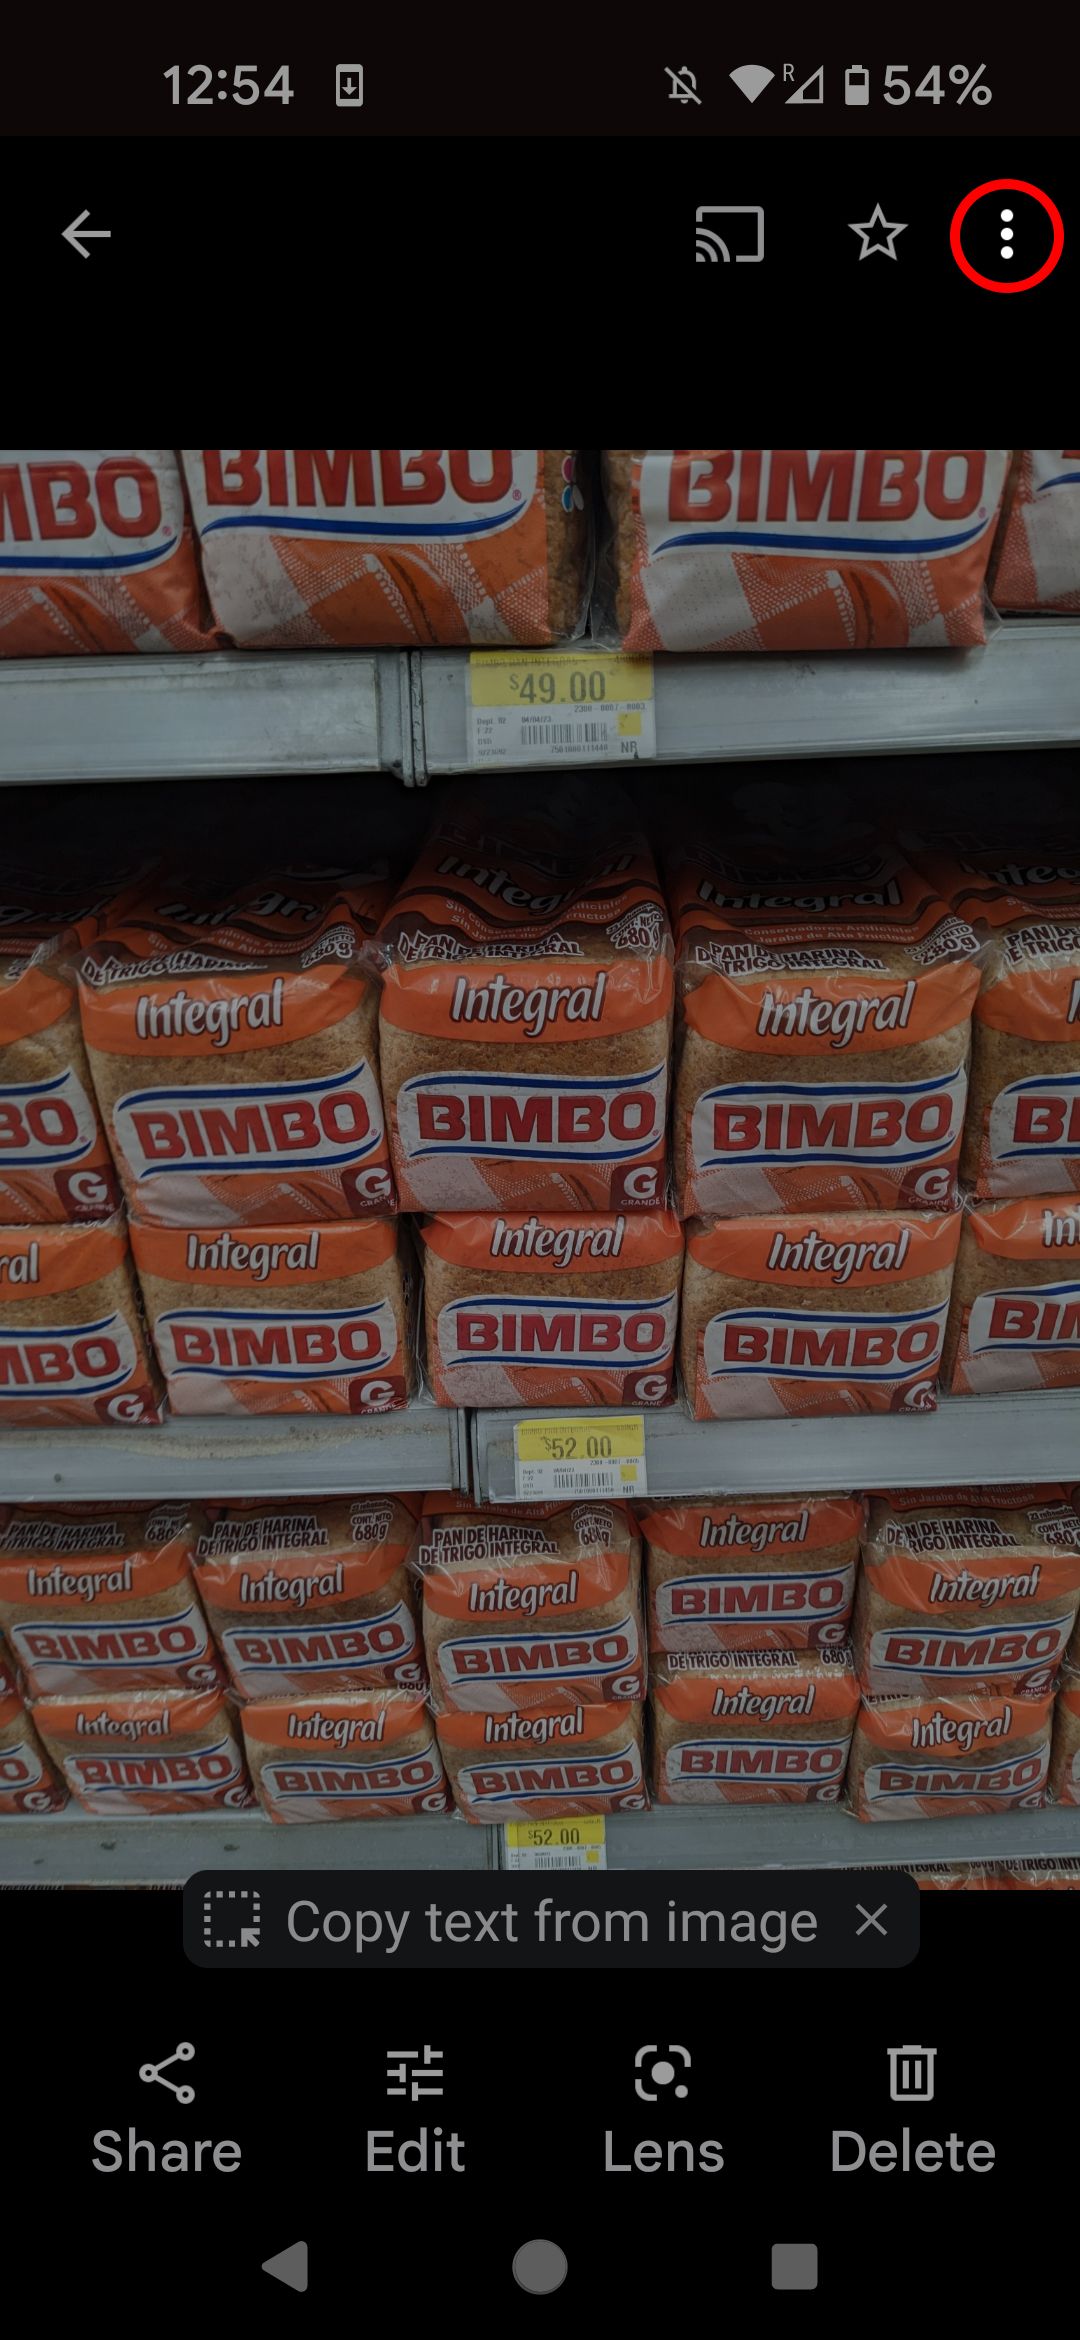
- Tap the three-dot icon in the upper-right corner.
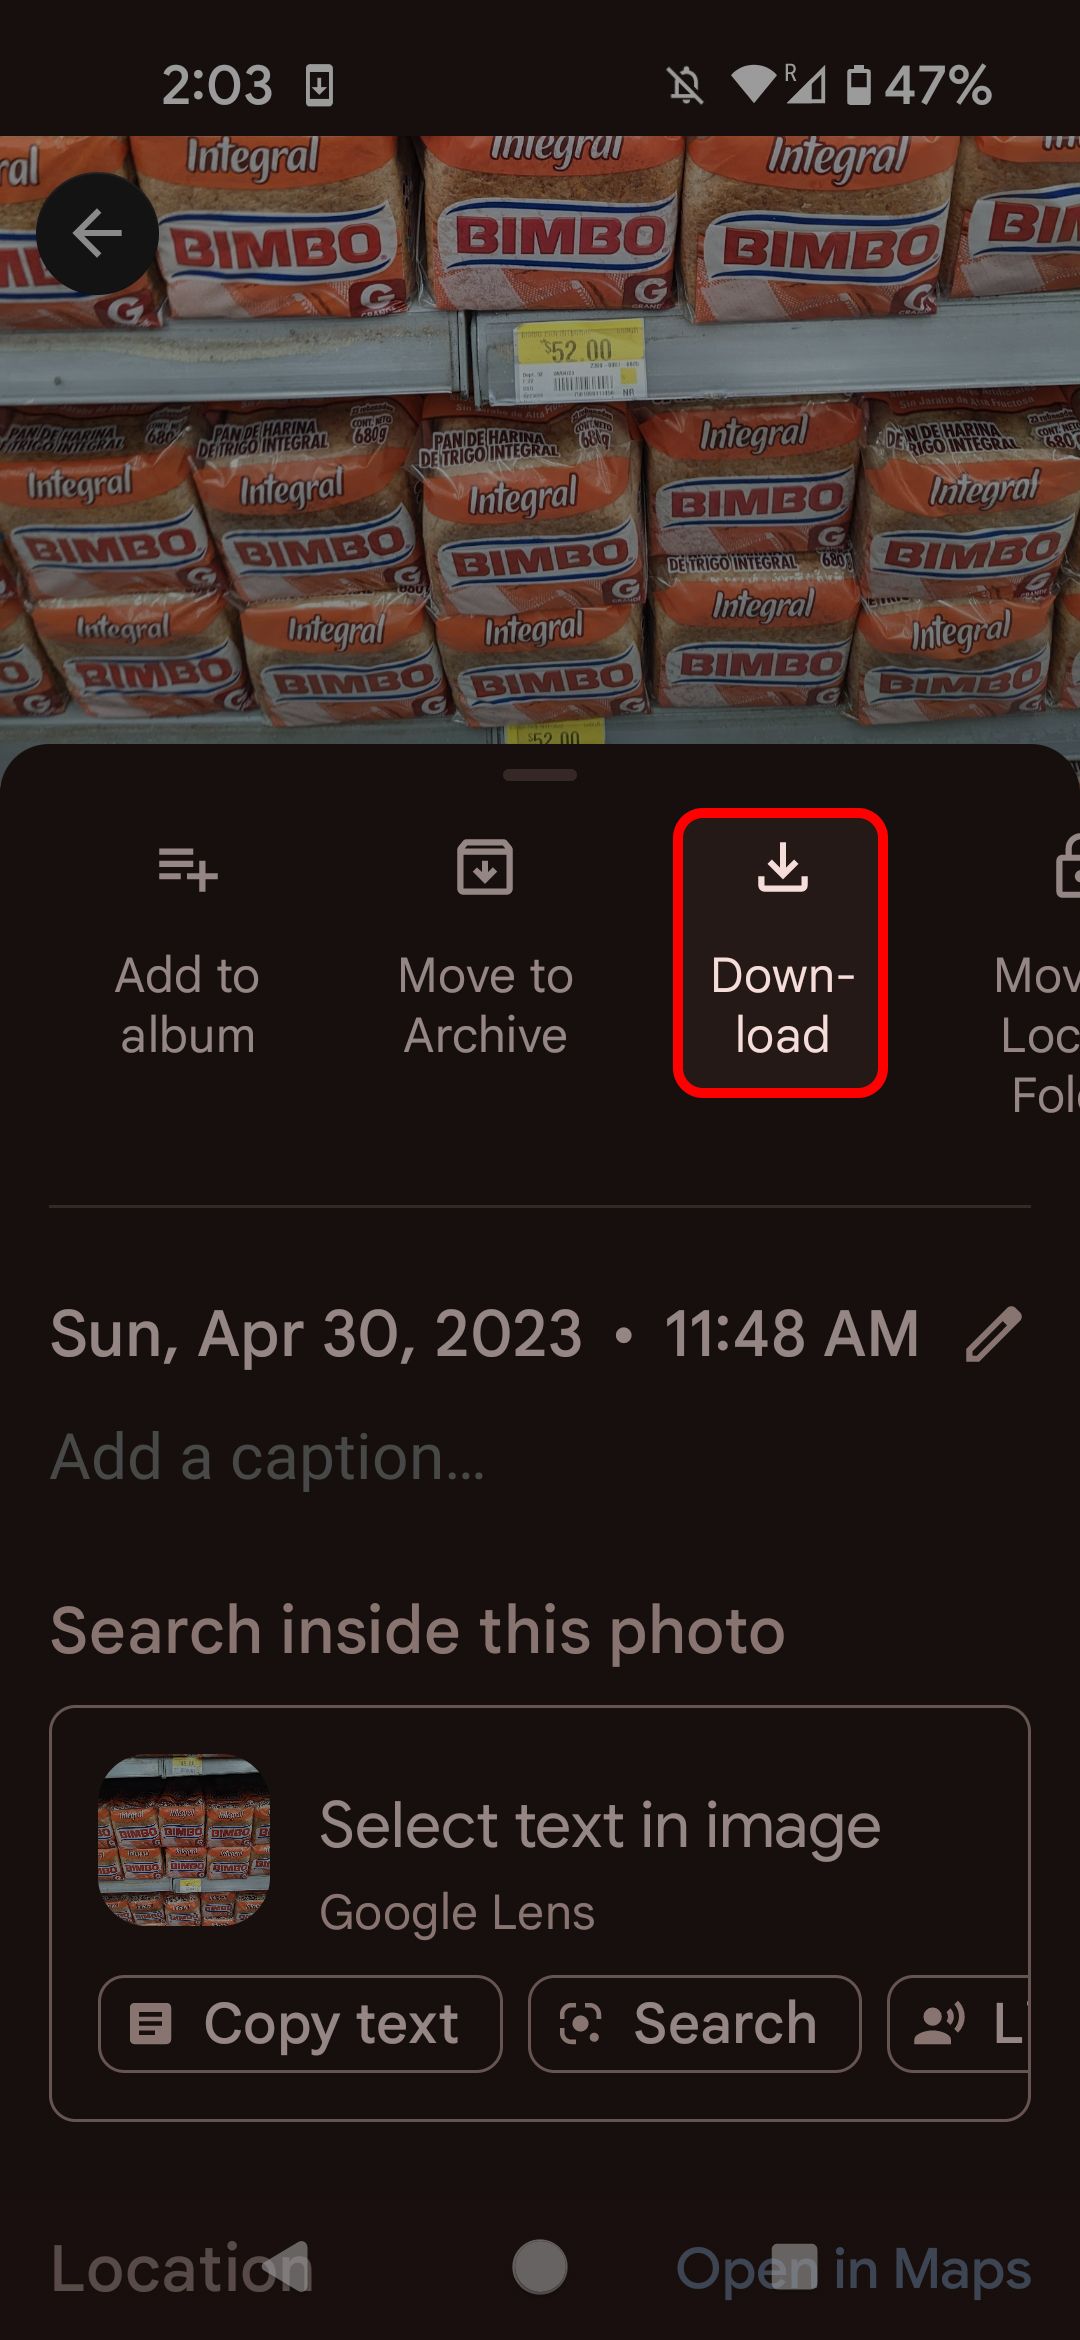
- Select Download. You don’t see this option if the image exists on your device.
Download your photos on the Google Photos website
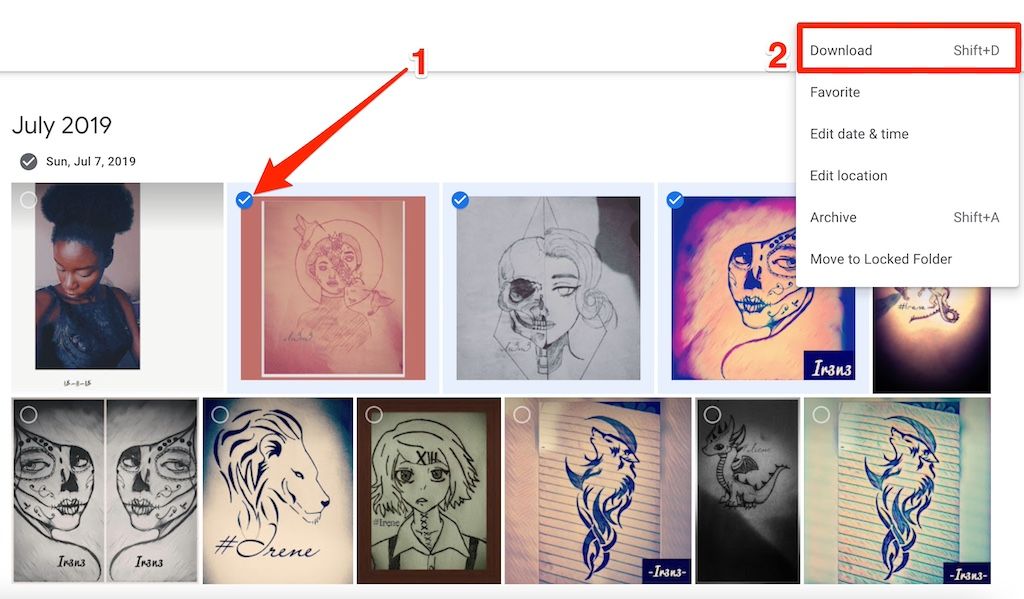
- Use your PC browser to visit photos.google.com and sign in to your account.
- Click the circles beside the images to select them.
- Press Shift + D to download them.
- Alternatively, click the three-dot icon in the upper-right corner. Then select Download.
Automatically upload your photos from your phone, tablet, or computer
When you install or use the Google Photos app on your device, you can set it up to automatically sync and back up your photos and videos. When activated, the app continuously uploads new photos and videos from your device to your Google Photos account in the cloud. You can upload them with the original quality or compress them to save storage.
Photos no longer offers free unlimited storage. You have only 15GB of storage unless you have a Google One subscription. Google Docs, Drive, and other workspace apps share this space.
Split your photos across OneDrive, Amazon Photos, and other cloud storage options. This way, you increase the amount of data you can store at no cost. Each service offers unique features, and you can take advantage of specific functionalities that one offers over another.
Related
How to move photos from Samsung Gallery to Google Photos
Google Photos is superior for cross-device photo management. We’ll help you transfer your Samsung Gallery images to the app quickly
Delete and restore images from Google Photos
Deleting unnecessary photos frees up storage space in your Google account, especially if you’re nearing your storage limit. You want to keep images of family, friends, and other memories. You don’t want to save the random photos your phone shoots while it’s in your pocket.
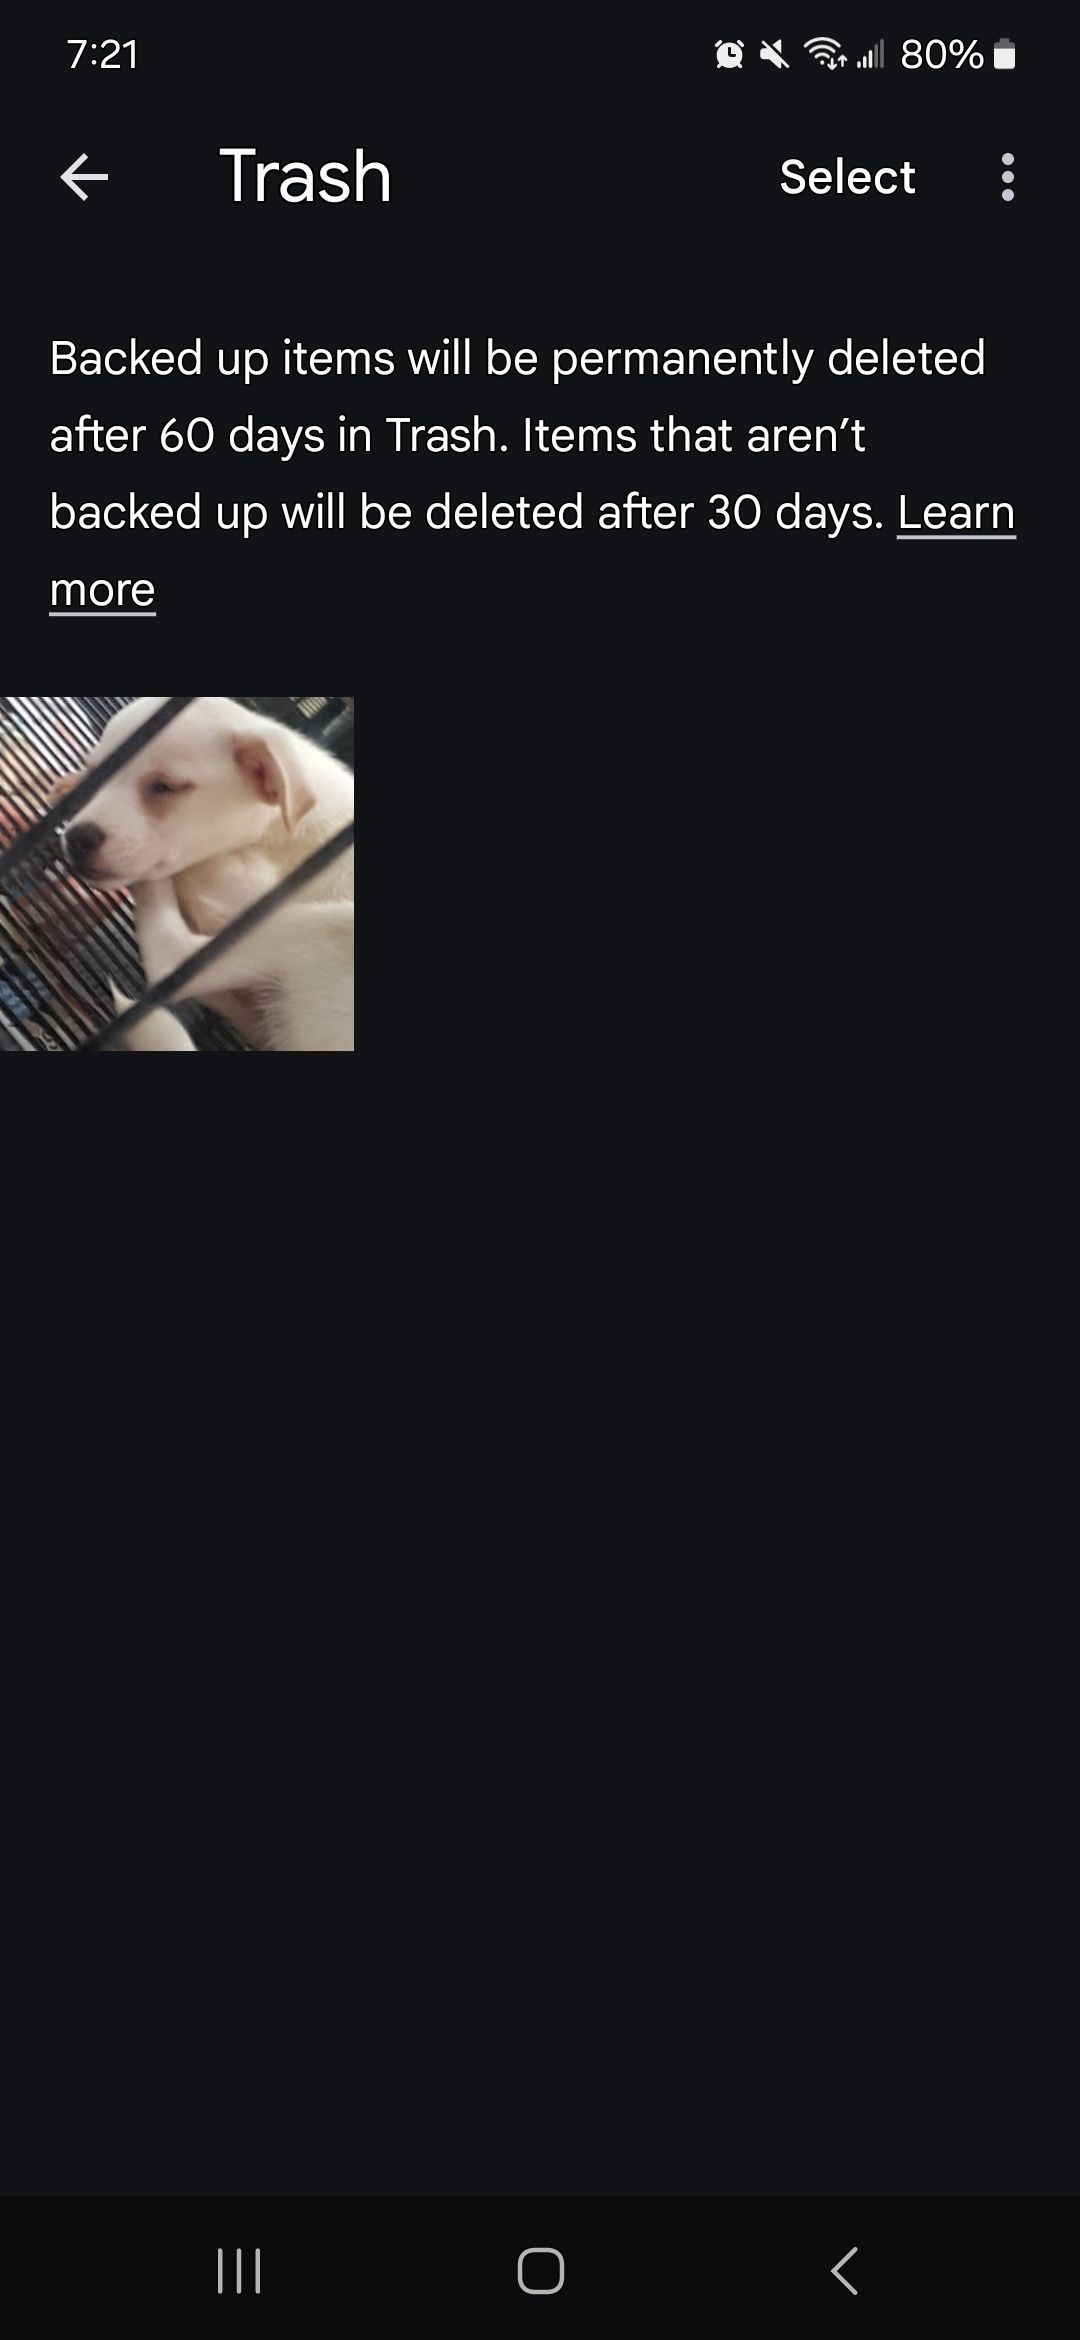
Deleting pictures from Google Photos moves them to the trash. They stay there for 60 days before the app wipes them permanently if you back them up. They last 30 days if you don’t back them up. You can restore the pictures if you change your mind within this period or make a mistake.
Restore pictures from the Google Photos app
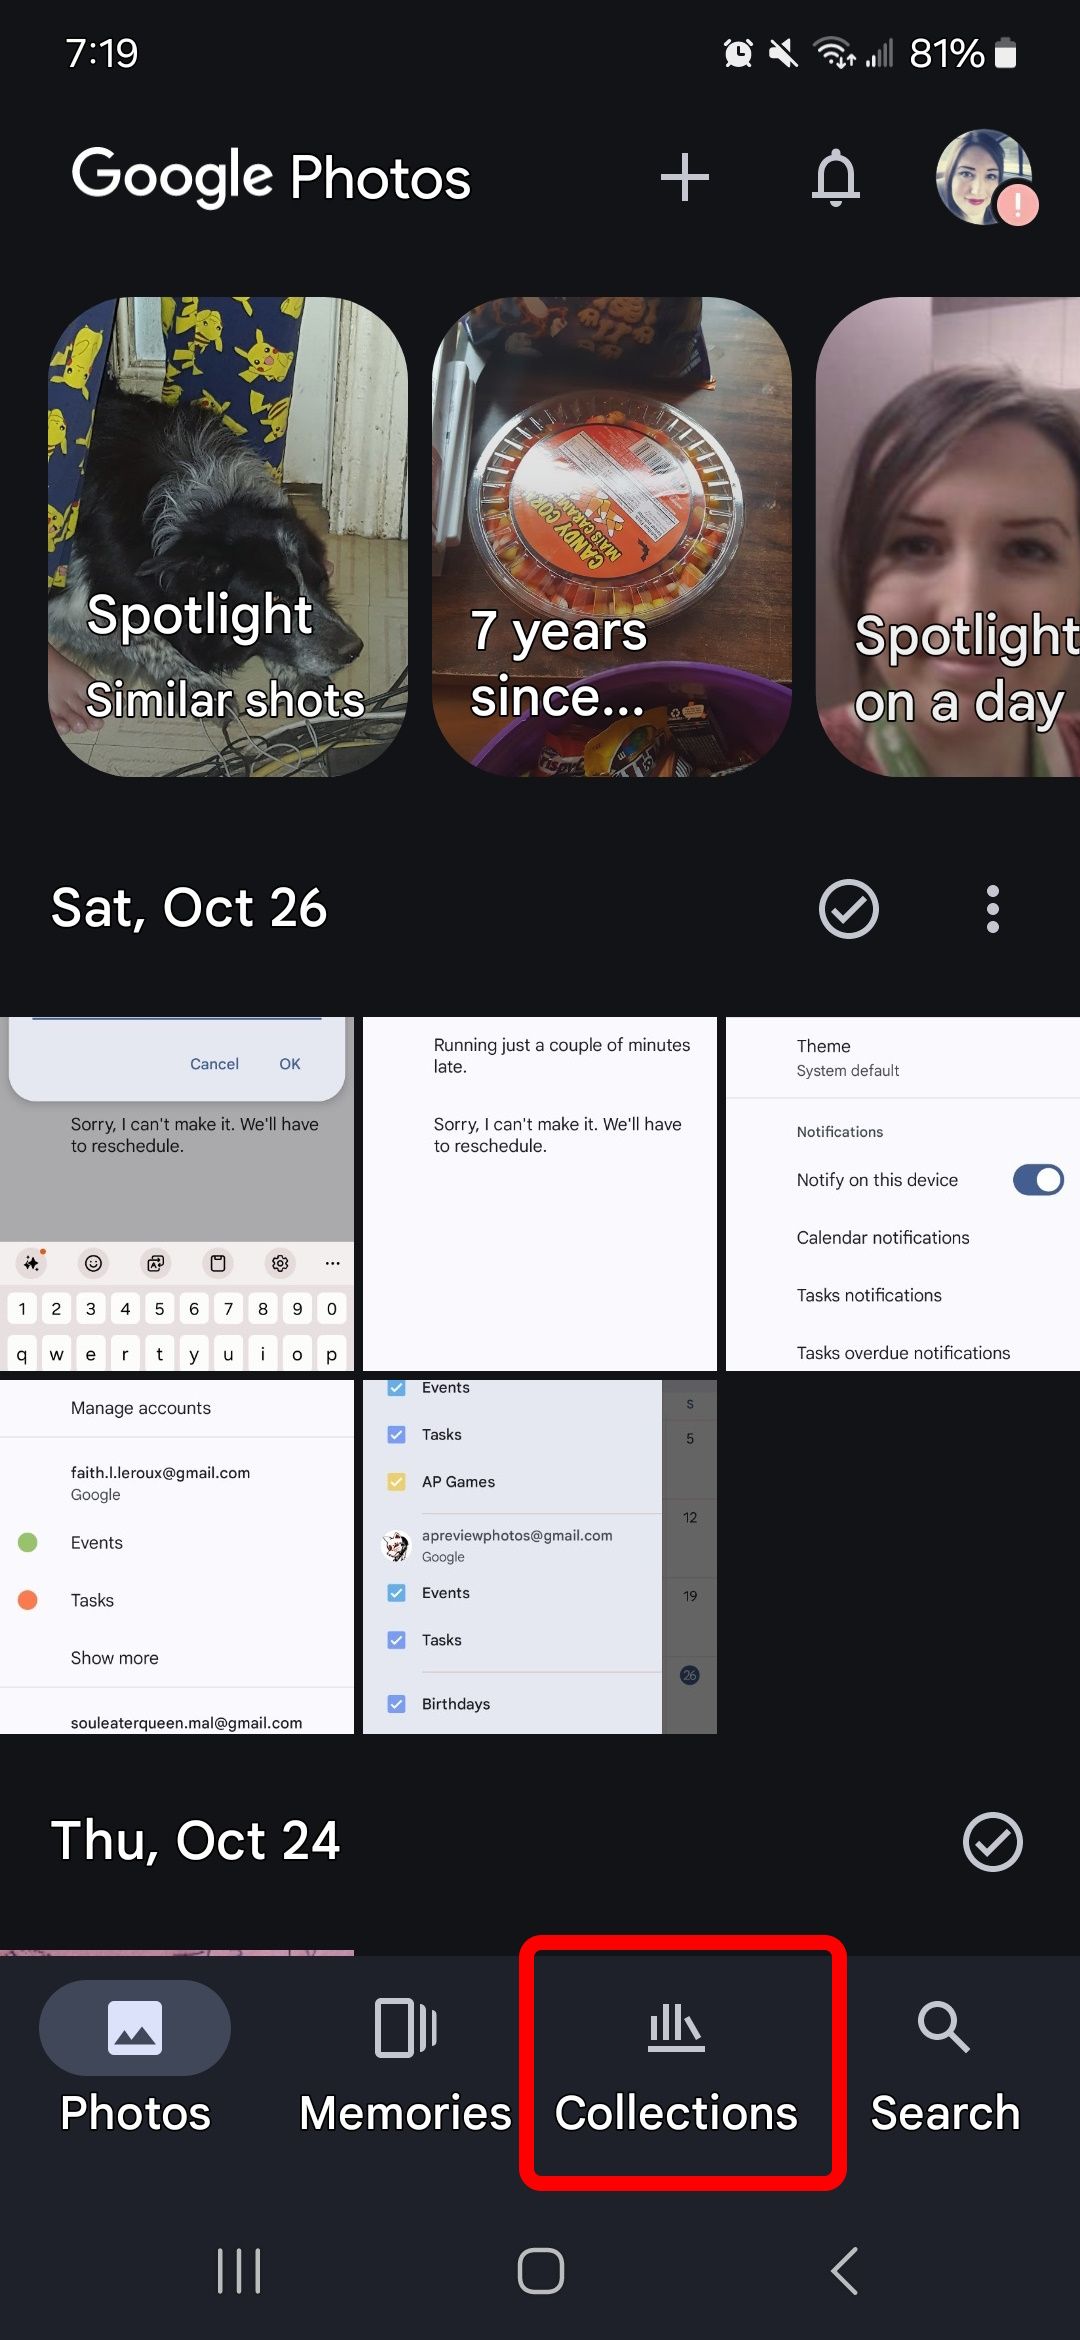
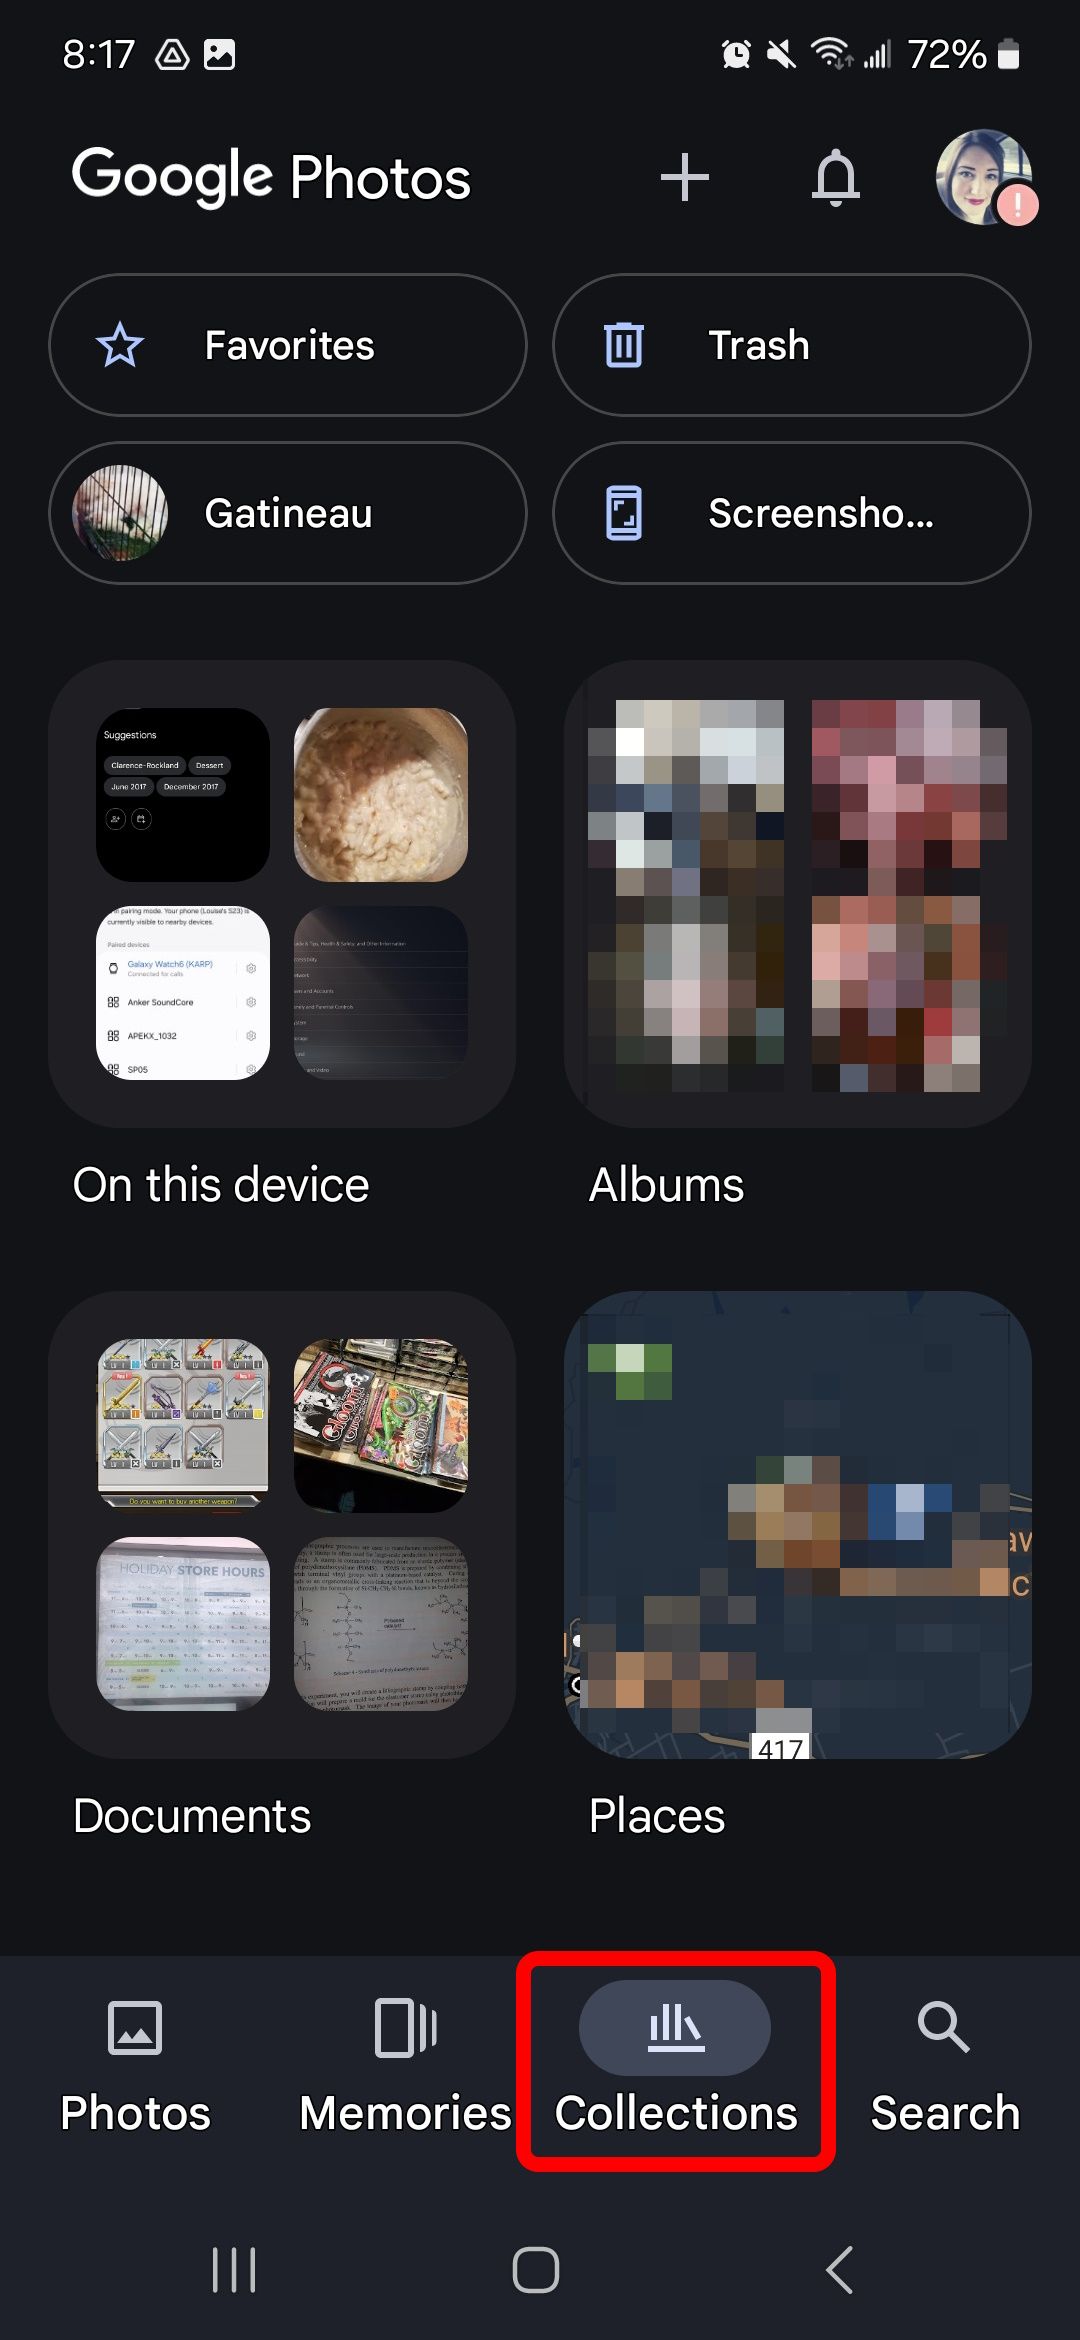
- Tap Collections at the bottom of your screen.
- Tap Trash near the top of the screen.
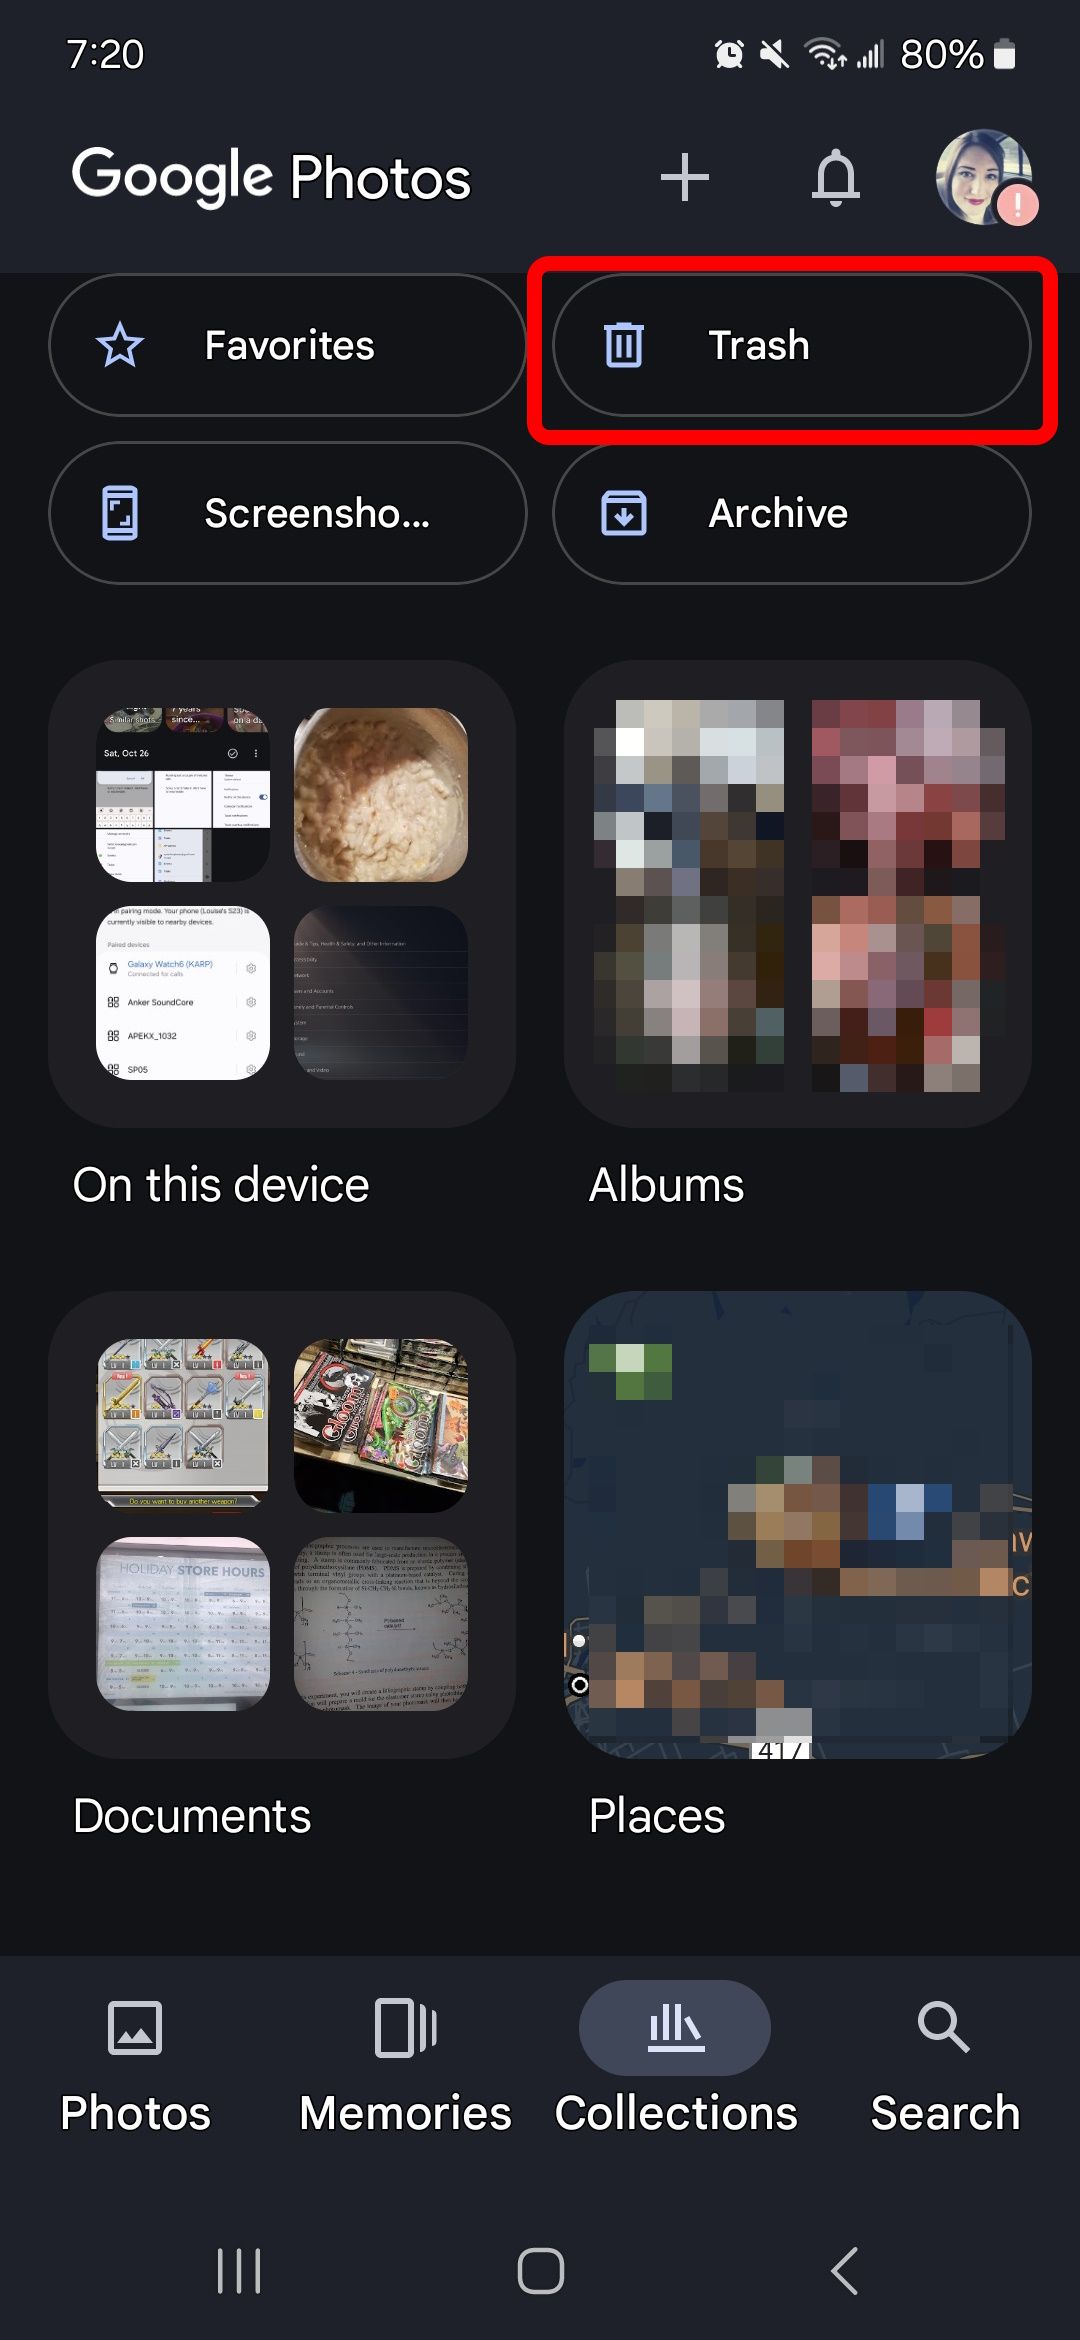
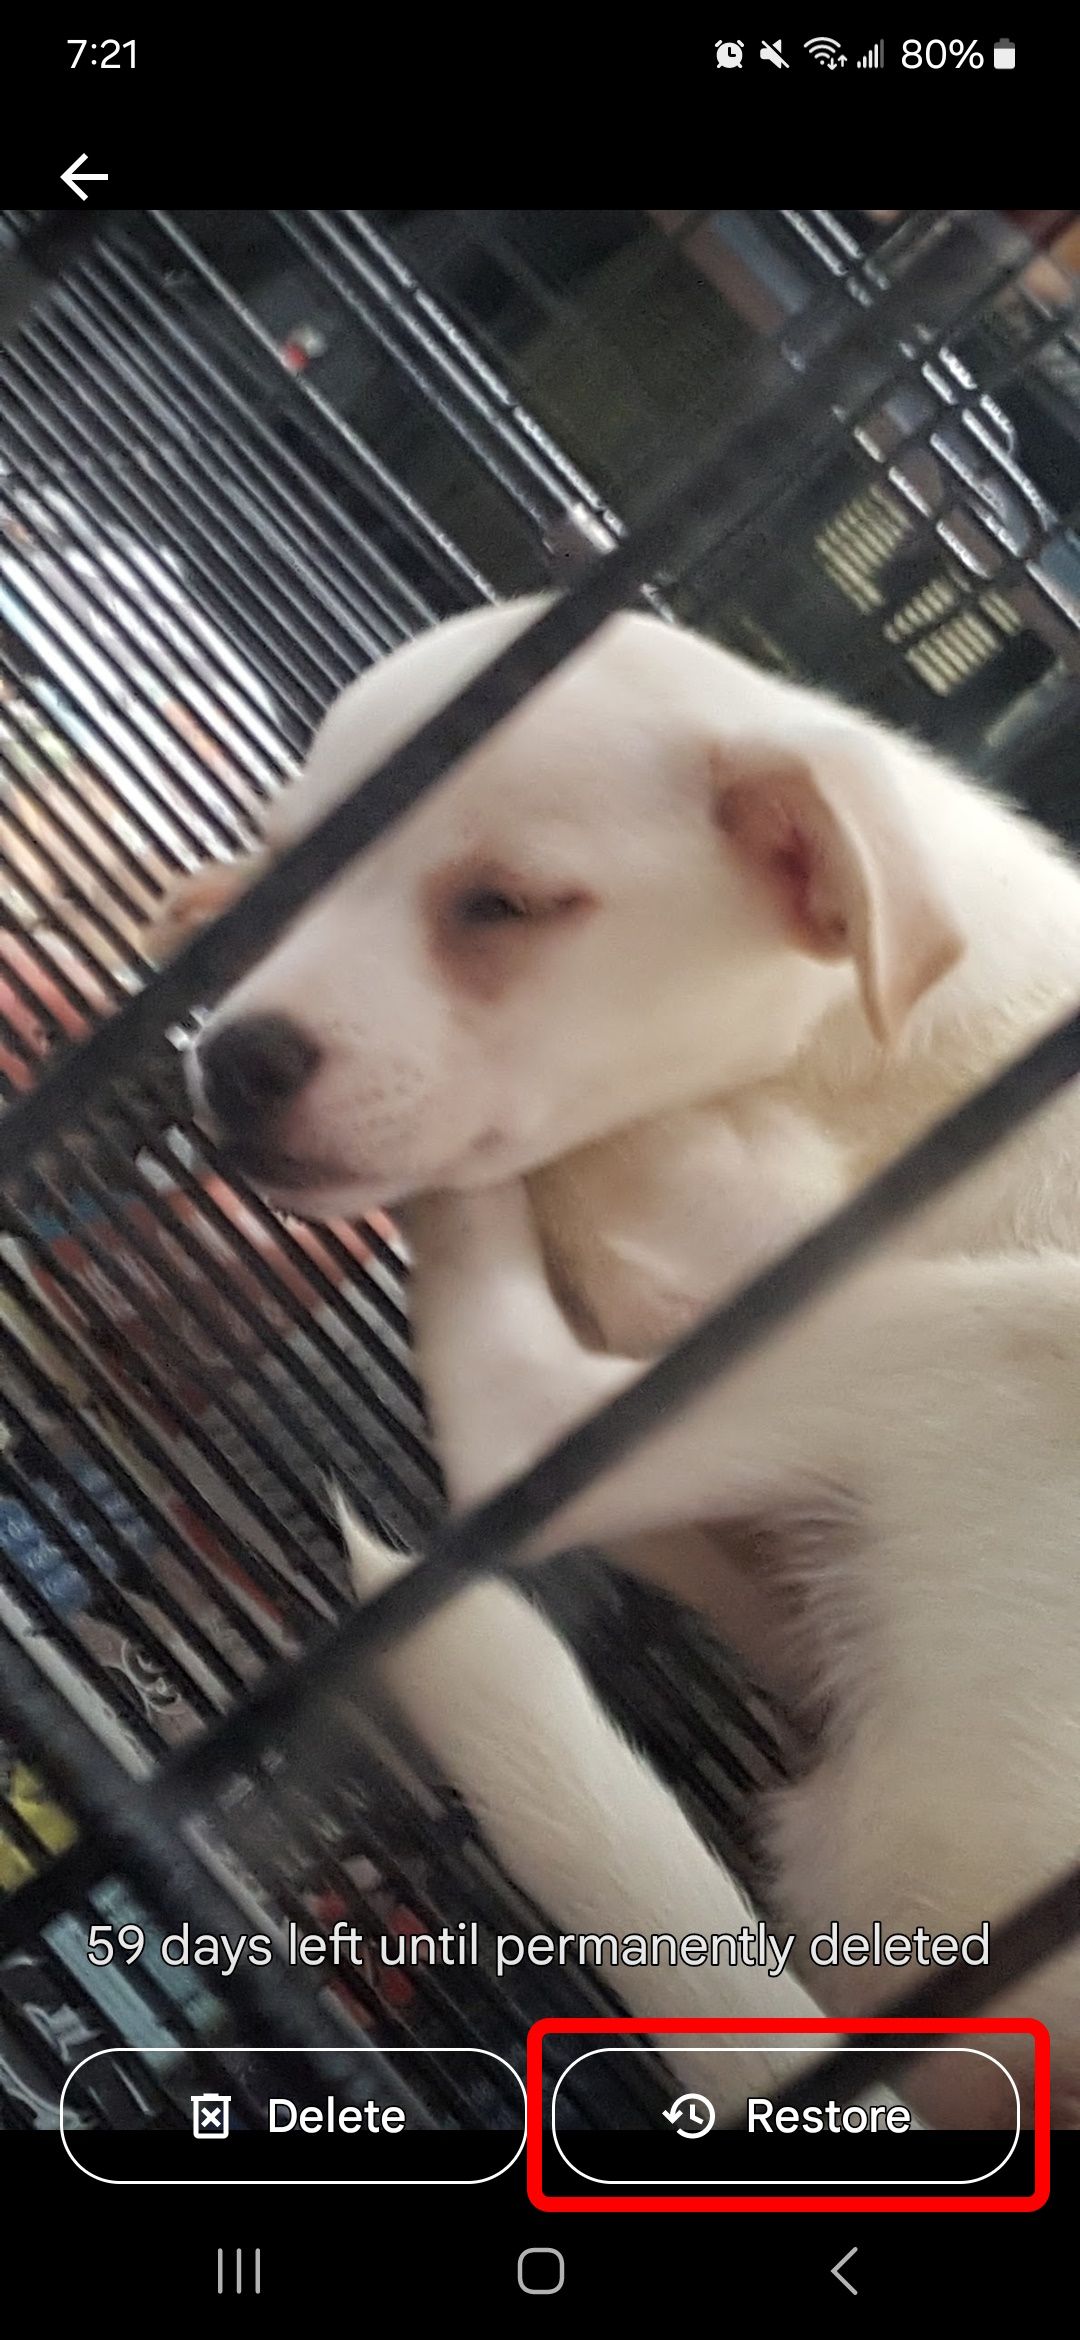
- Select the image to recover and tap Restore.
Restore pictures from the Google Photos web version
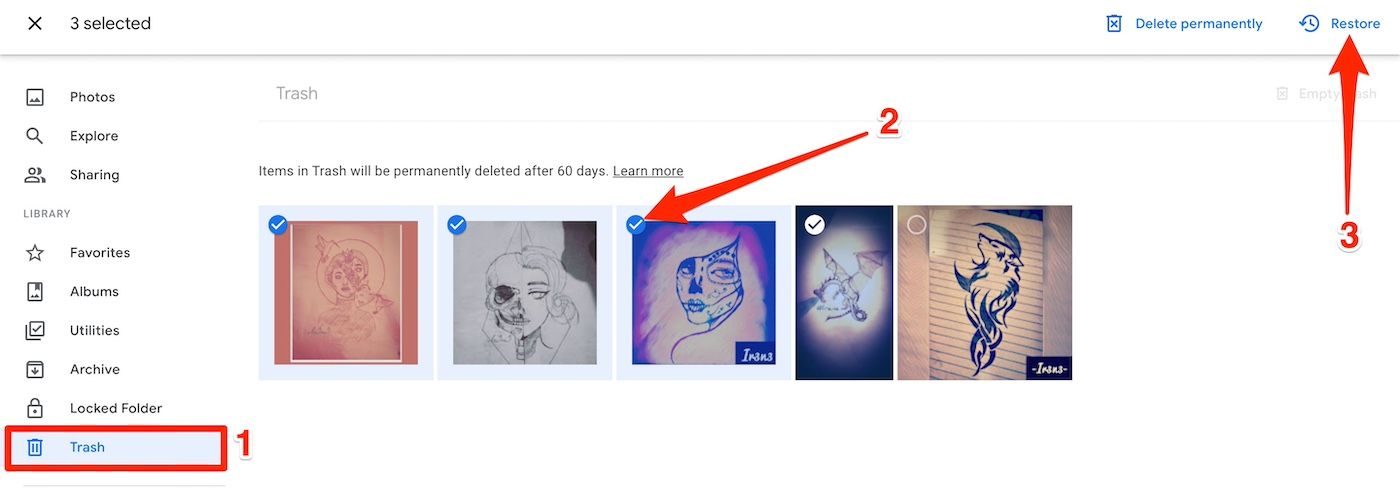
- Use a PC browser to visit photos.google.com and sign in to your account.
- Click Trash from the left panel.
- Check the circles beside the images to select them.
- Click Restore in the upper-right corner.
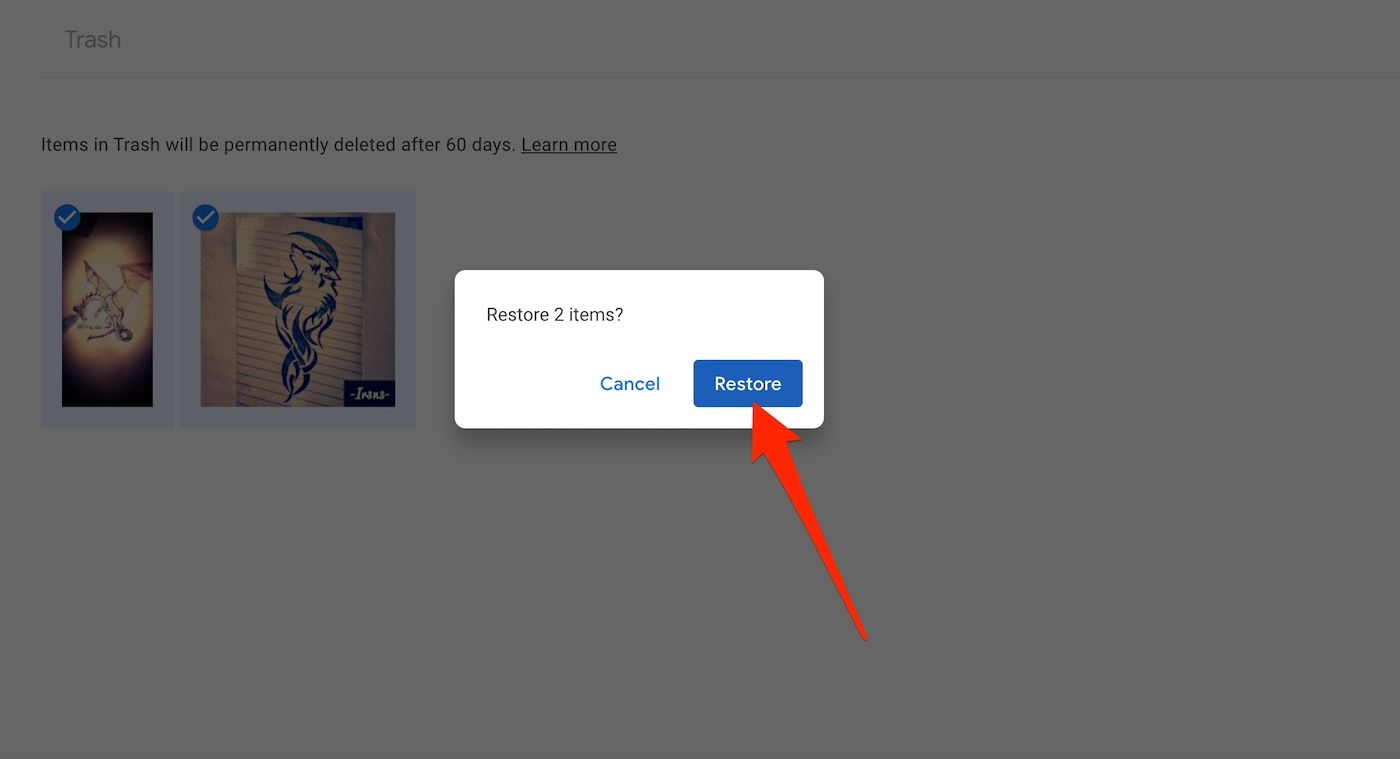
- Select Restore to confirm.
Use Google Photos’ AI tagging features
Google Photos’ AI tagging feature combines Artificial Intelligence and Machine Learning to analyze the visual content of your images. It allows the app to automatically identify objects, people, locations, and more to create albums based on common elements. You can search, organize, and share related image collections easily.
When it misses, manually assign labels so that the app identifies similar images in the future. Turn on Face Grouping first so that the app scans your photos for facial features and creates a unique identifier for each person. If you don’t, it only scans for documents and other things. Here’s how to turn on Face Grouping and tag images in Google Photos.
Turn on Face Grouping in Google Photos
- Open the Photos app.
- Tap your profile picture in the upper-right corner of your screen.
- Select Photos settings.
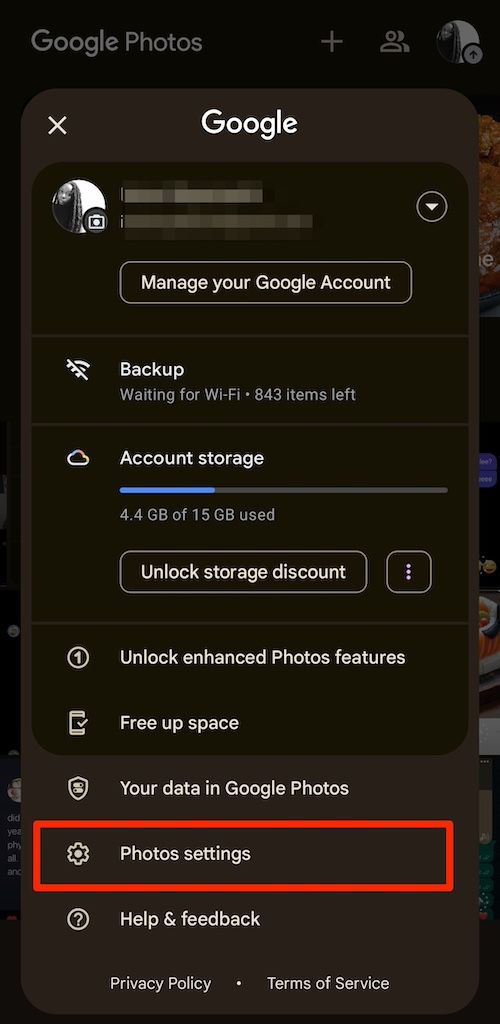
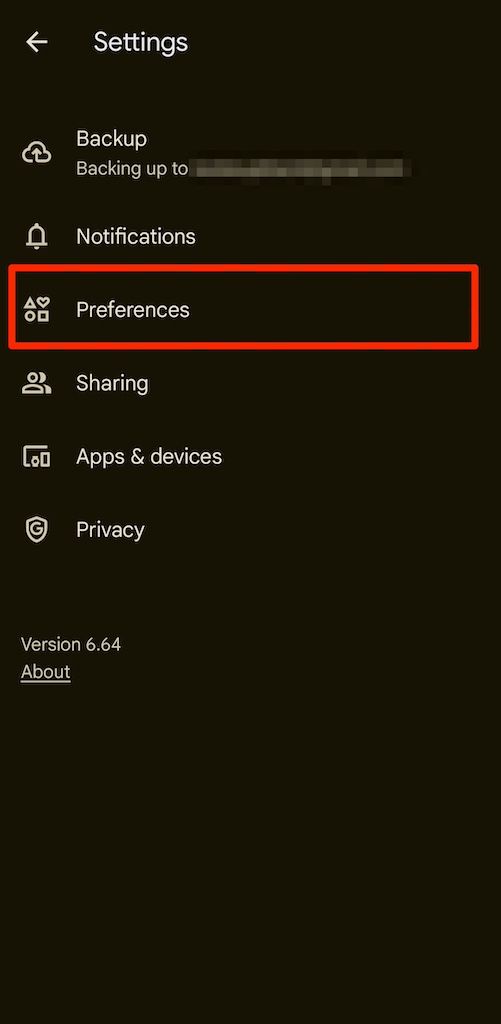
- Go to Preferences > Group similar faces.
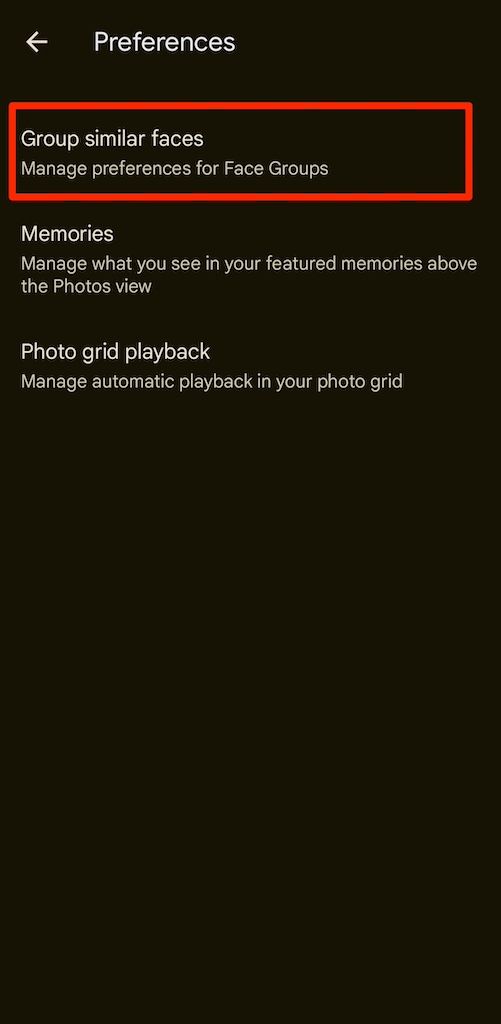
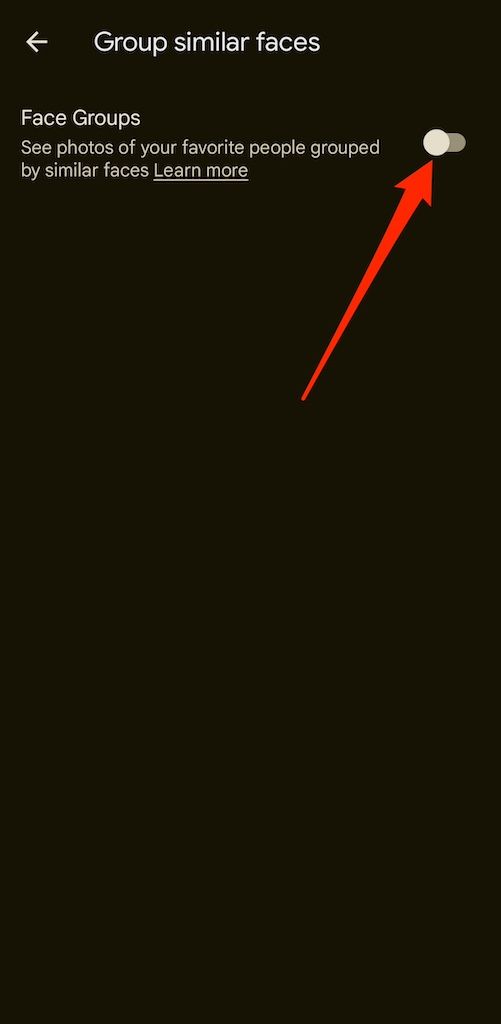
- Turn on the Face Groups toggle. It may be activated by default.
Tag images in Google Photos
- Tap Collections at the bottom of your screen.
- Tap on a category such as People, Pets, or Documents.
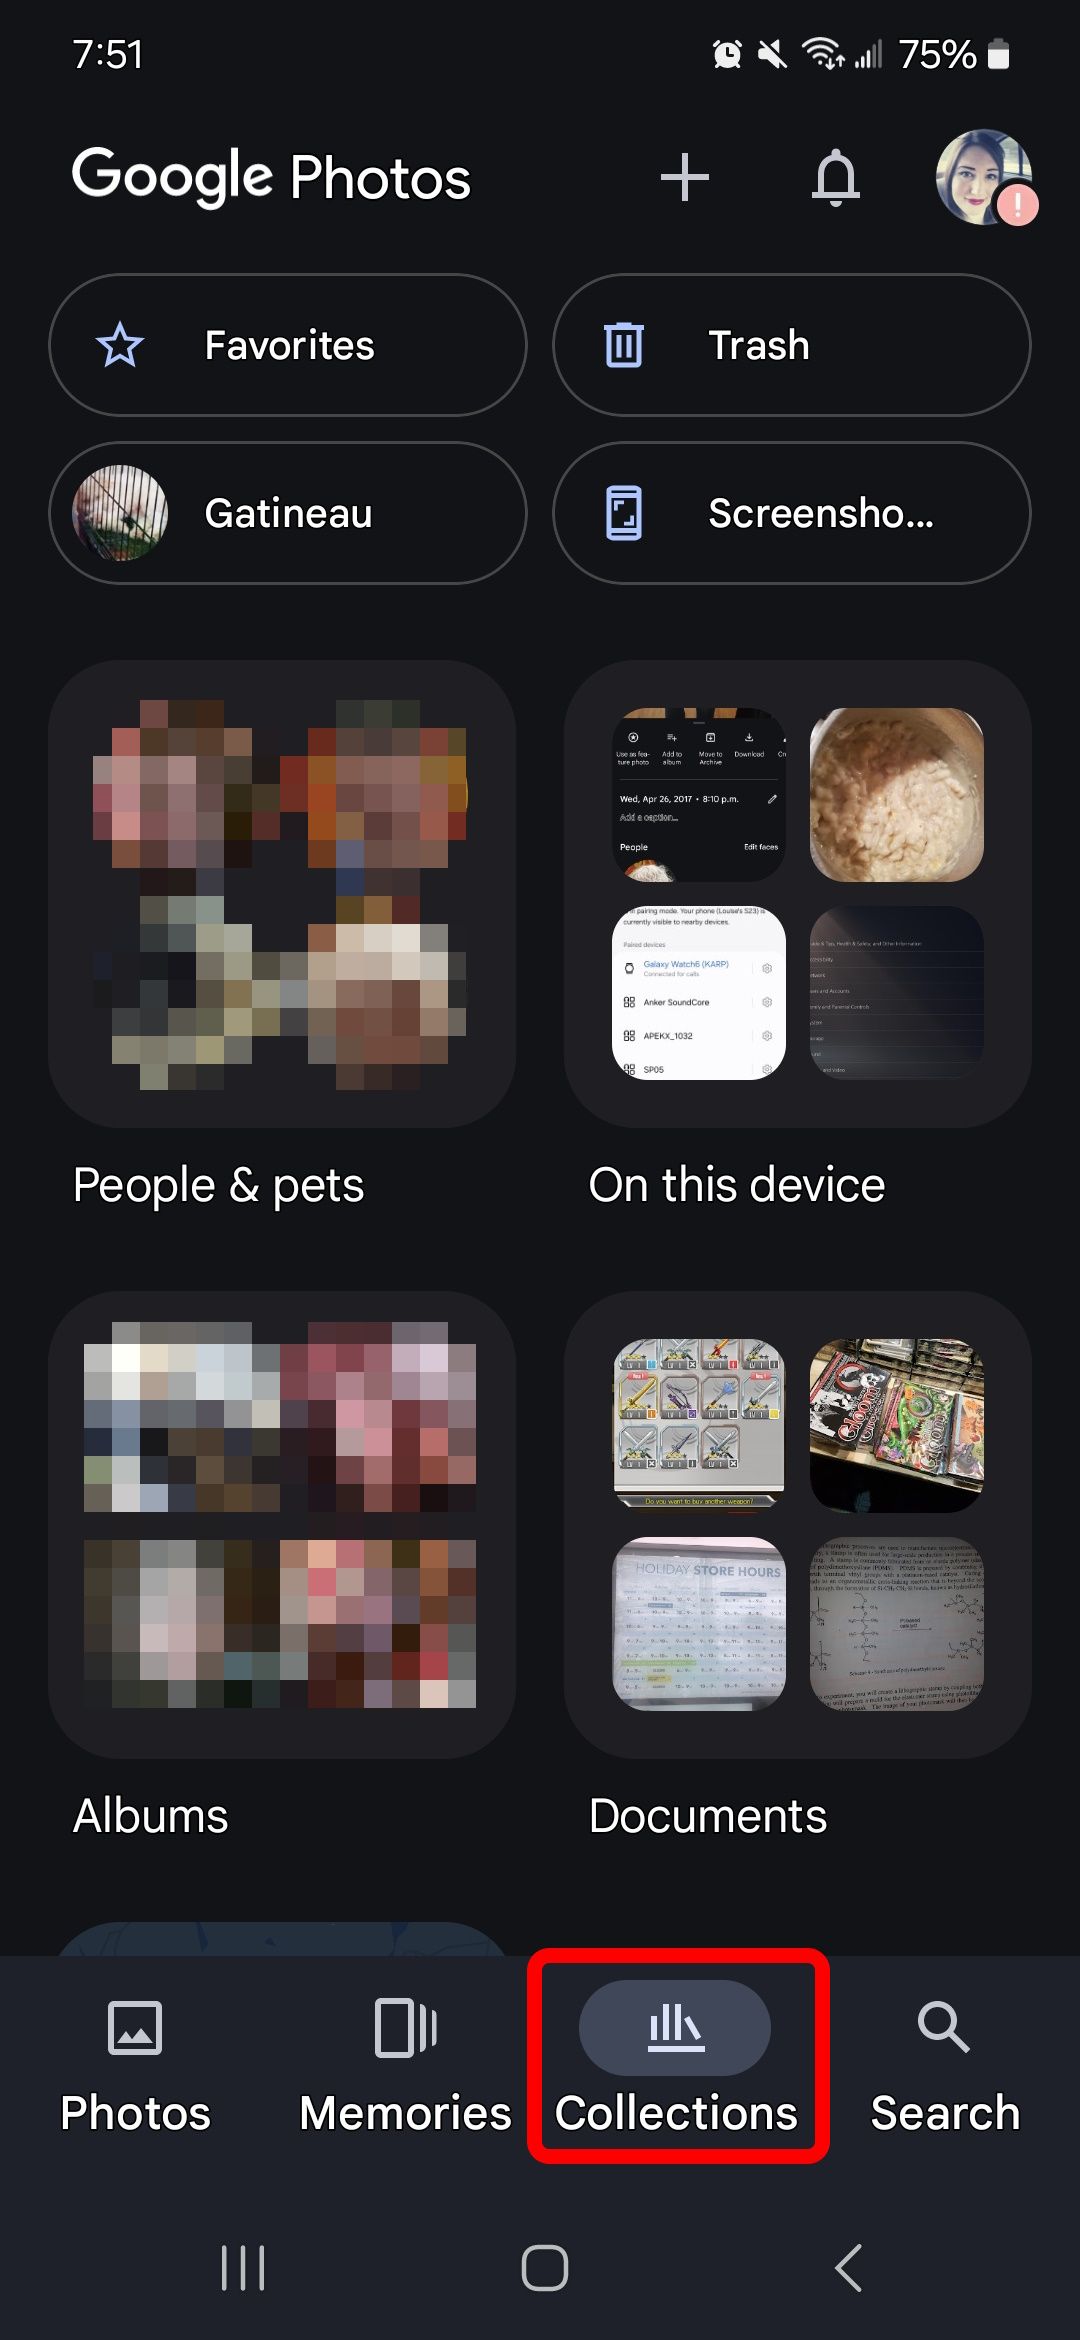
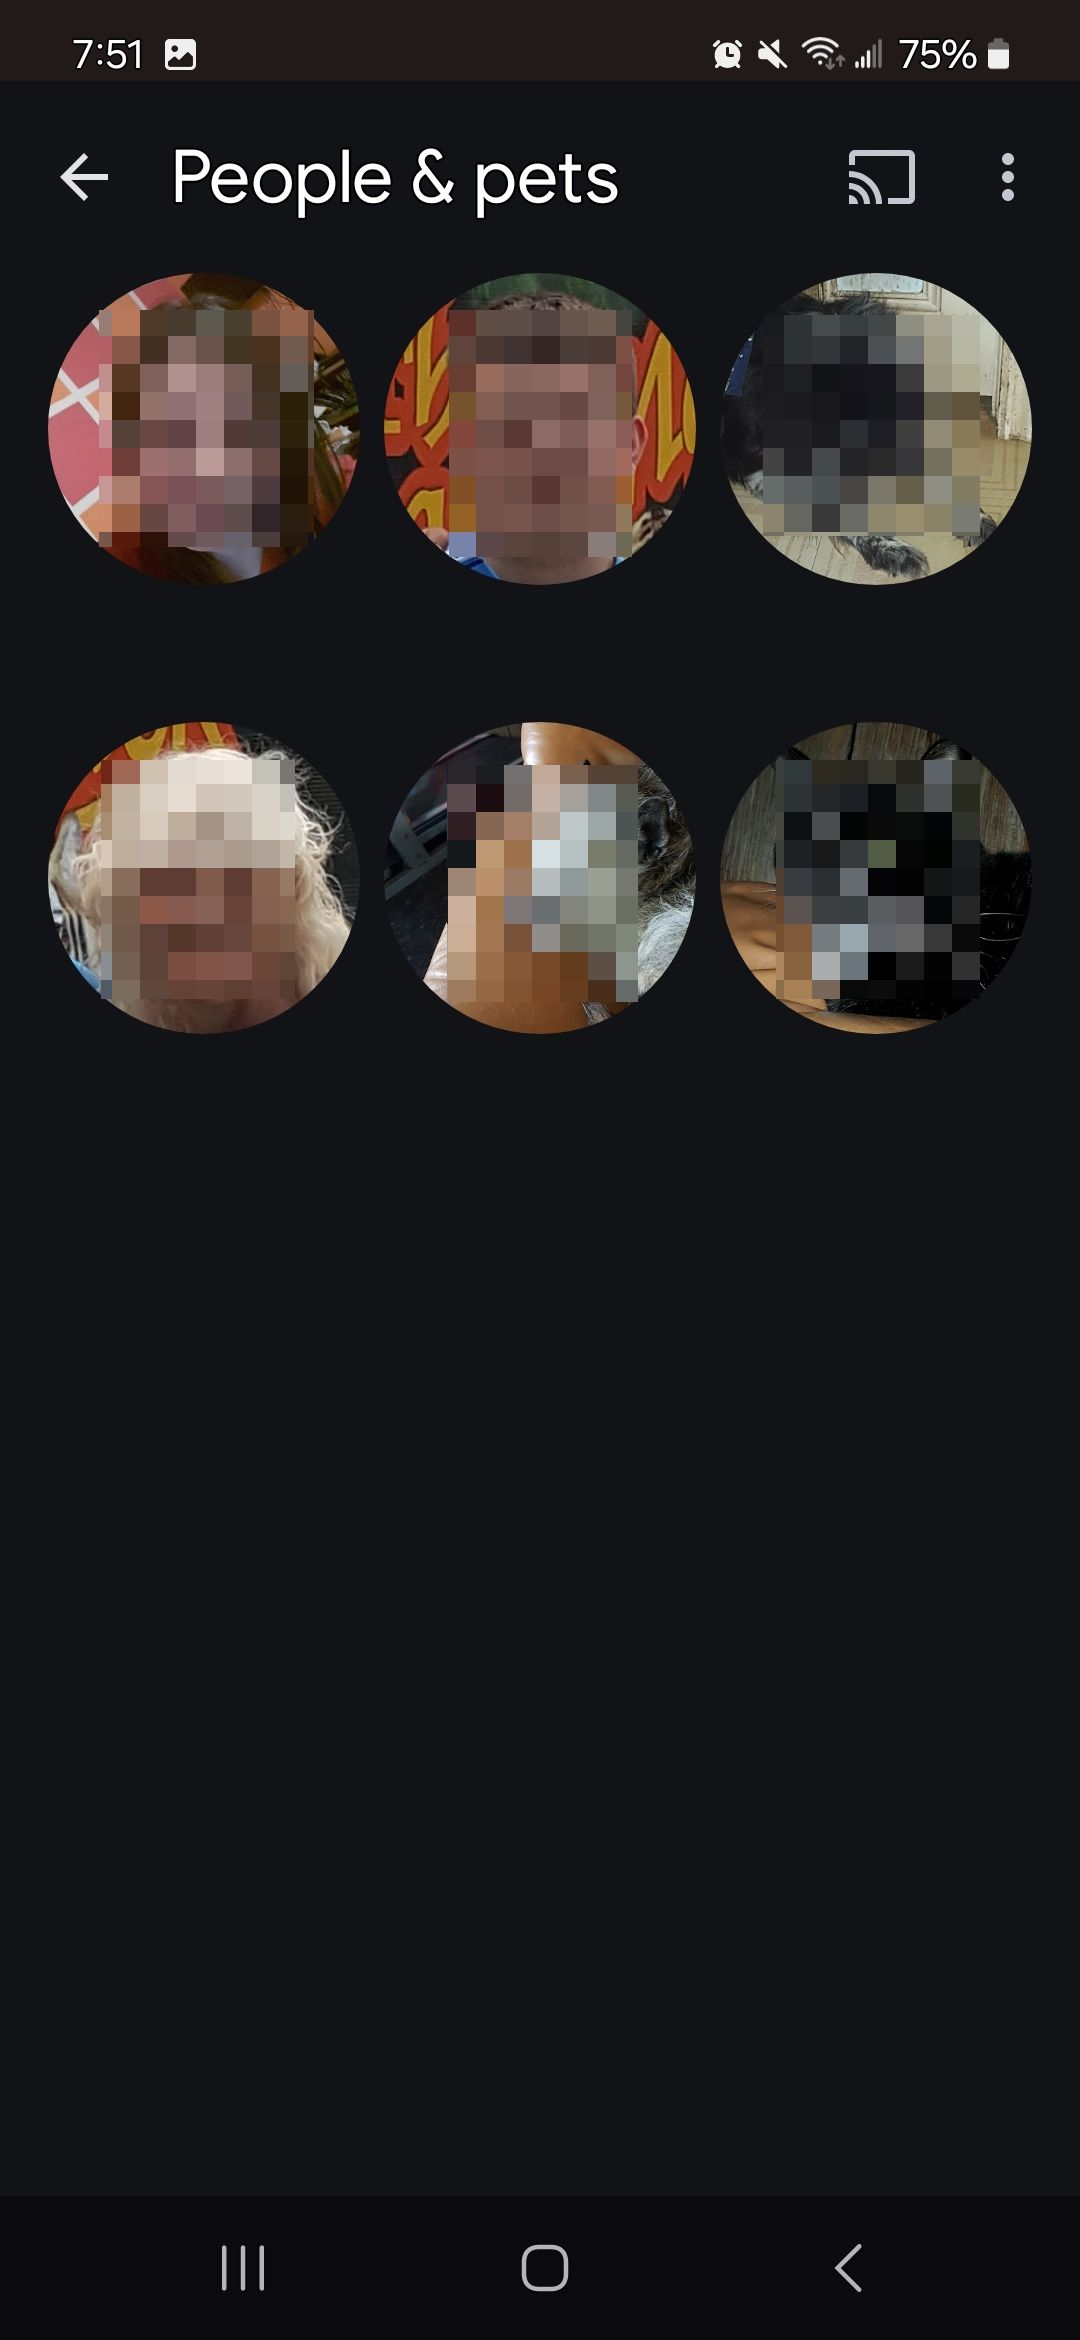
- Tap a person, pet, or other things you wish to label. You’ll see all the photos of them the app identifies.
- Scroll down and tap Add name to type a name.
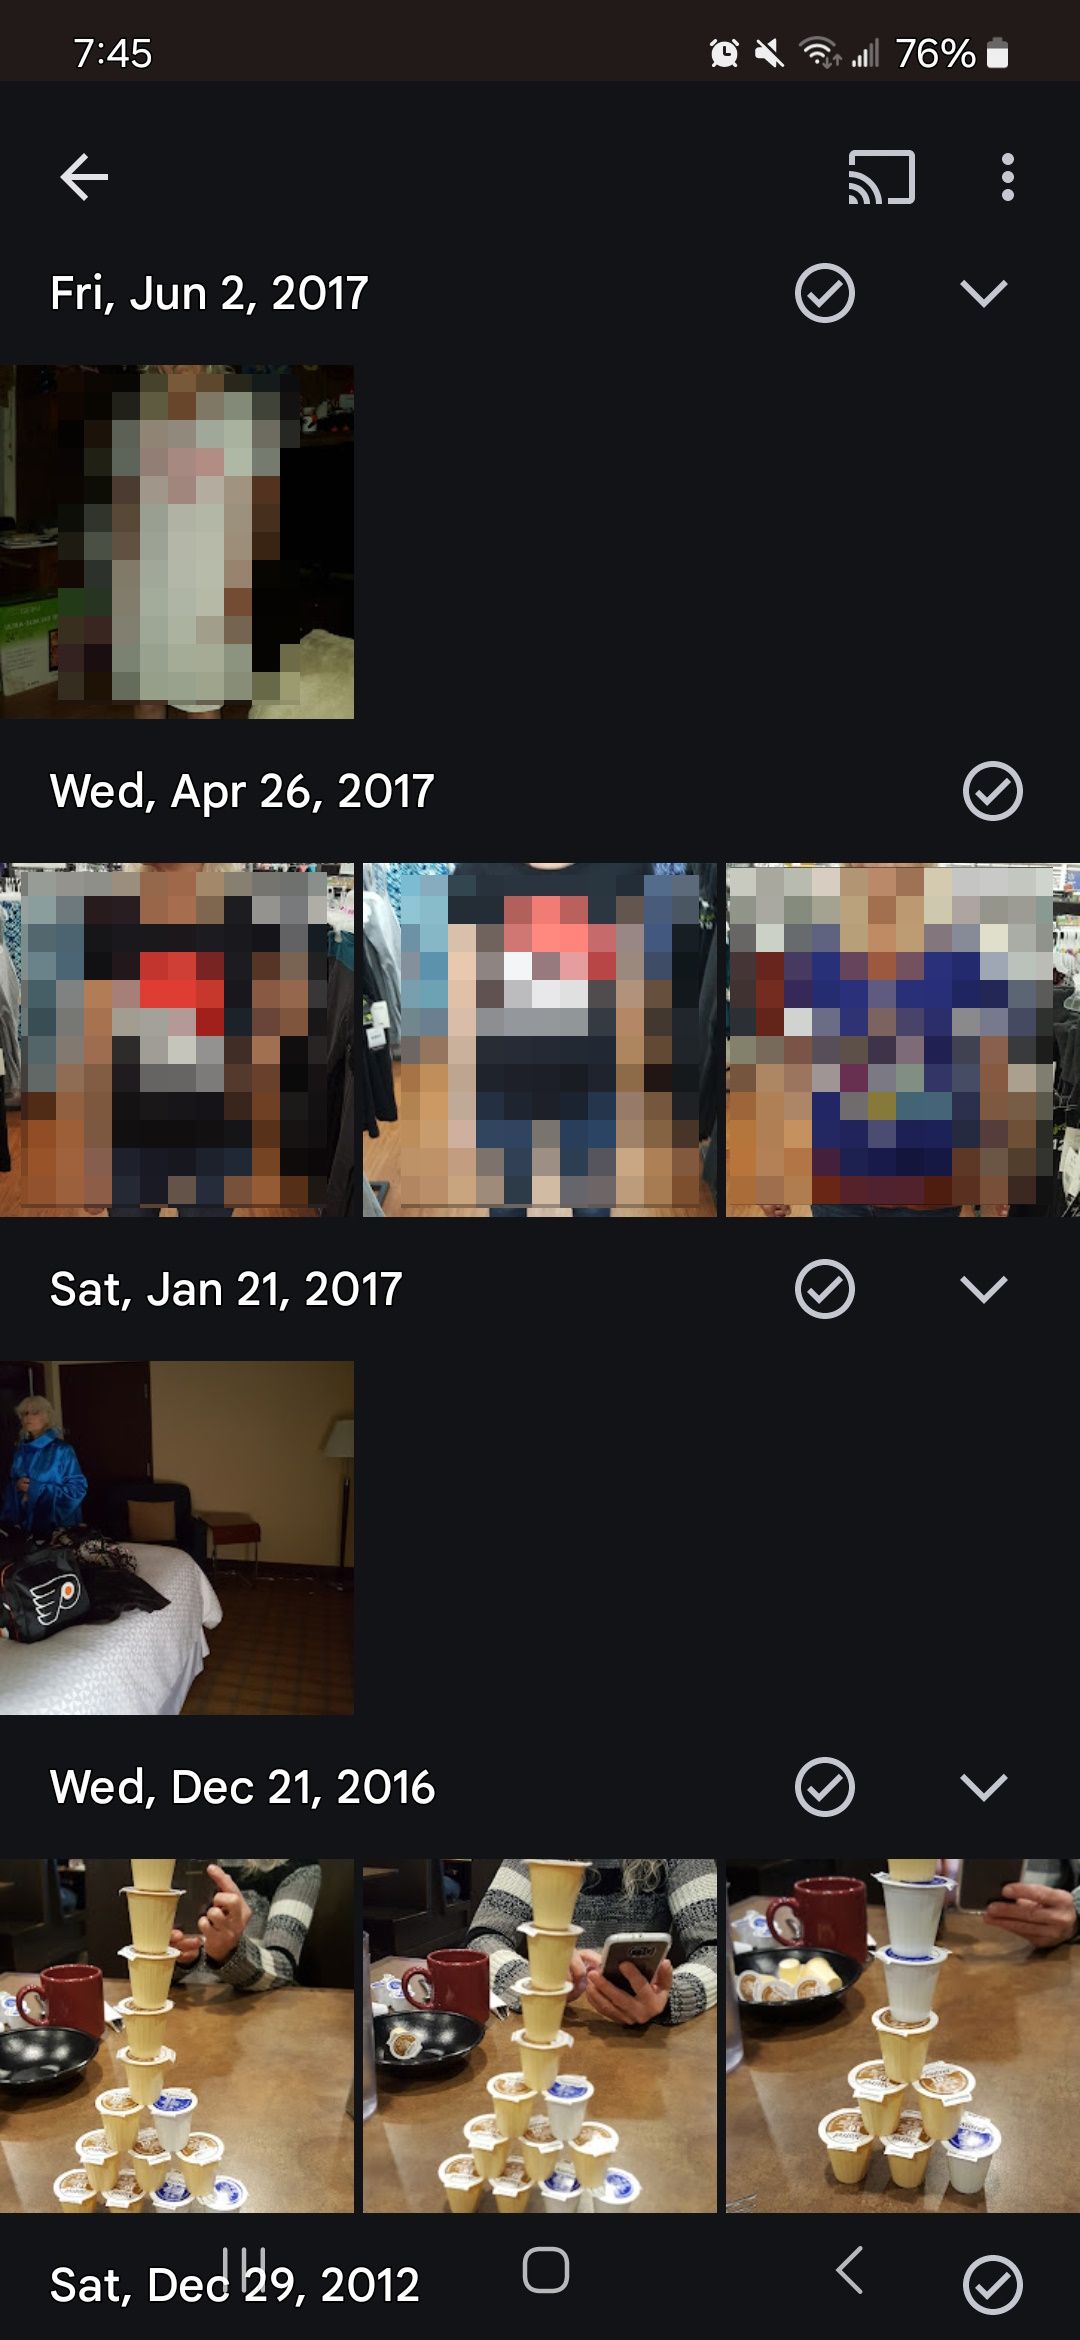
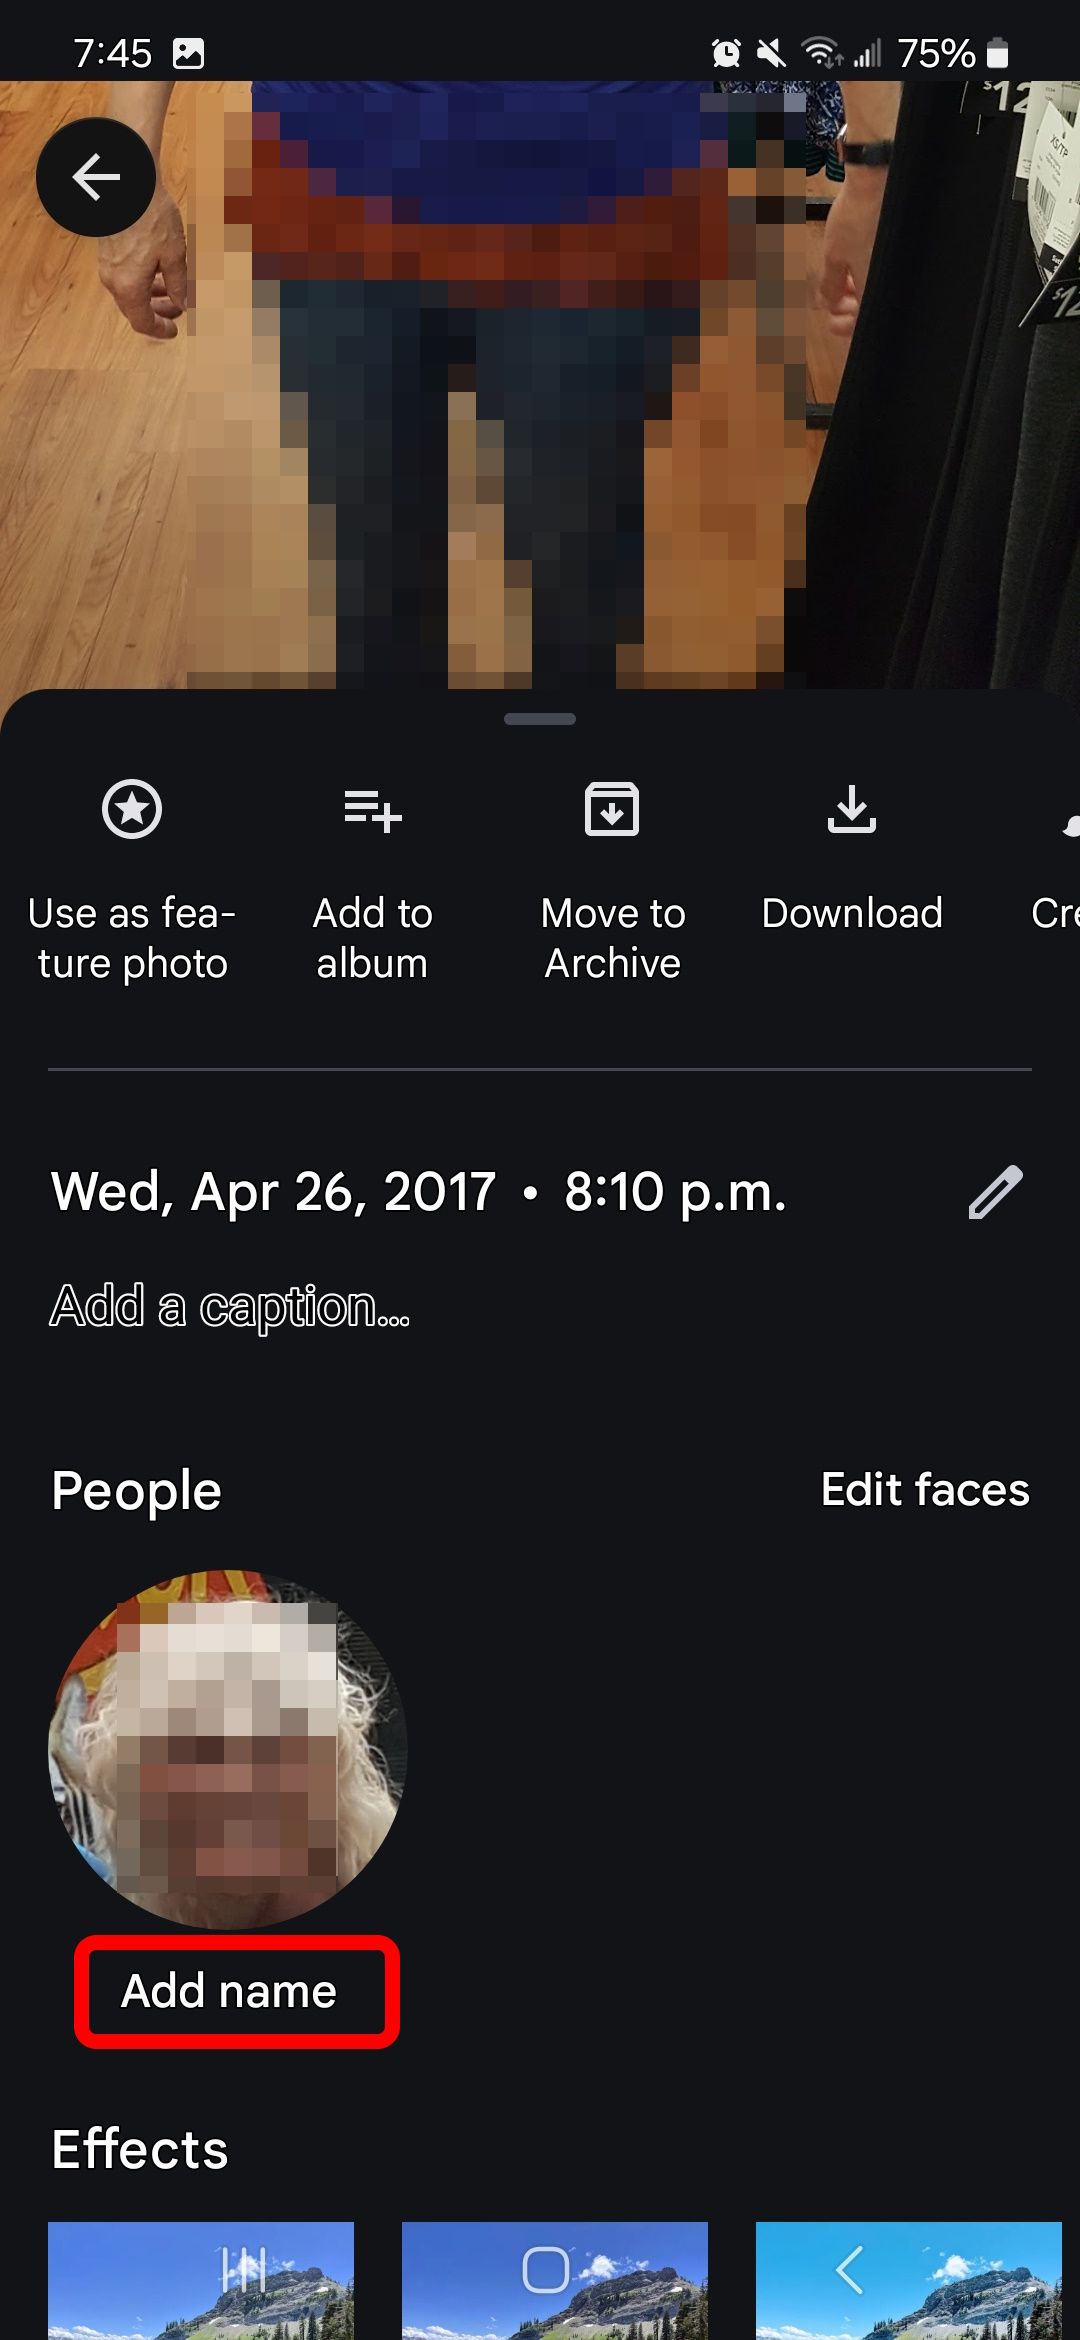
Google Photos identifies the person, pet, or thing and labels all related images. Google Photos will improve the search function with Ask Photos. Google is designing Ask Photos to be a conversational advanced search tool that works alongside Google Gemini. You can search using specific search queries with added context, or it can dig up information related to your personal gallery. The feature is still in early access since September 2024 in the US.
Compress photos to maximize your free Google Drive storage
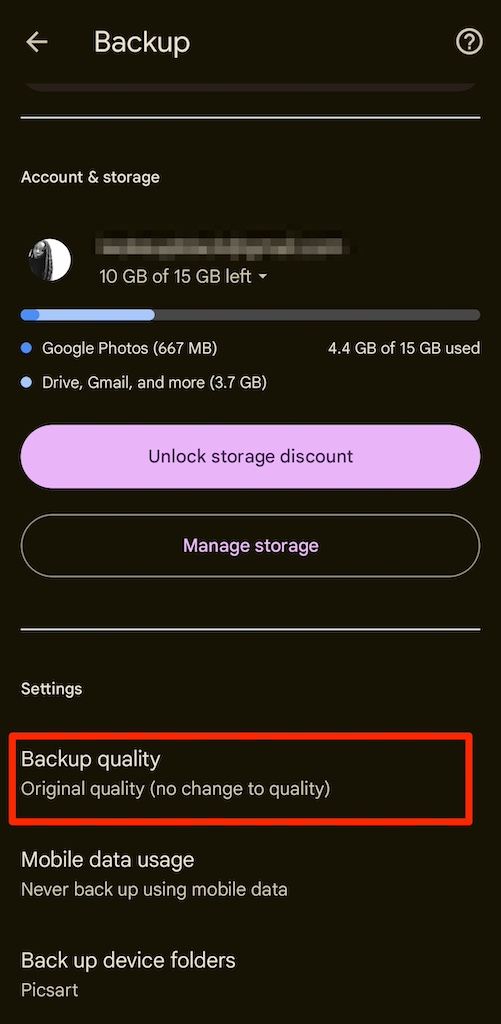
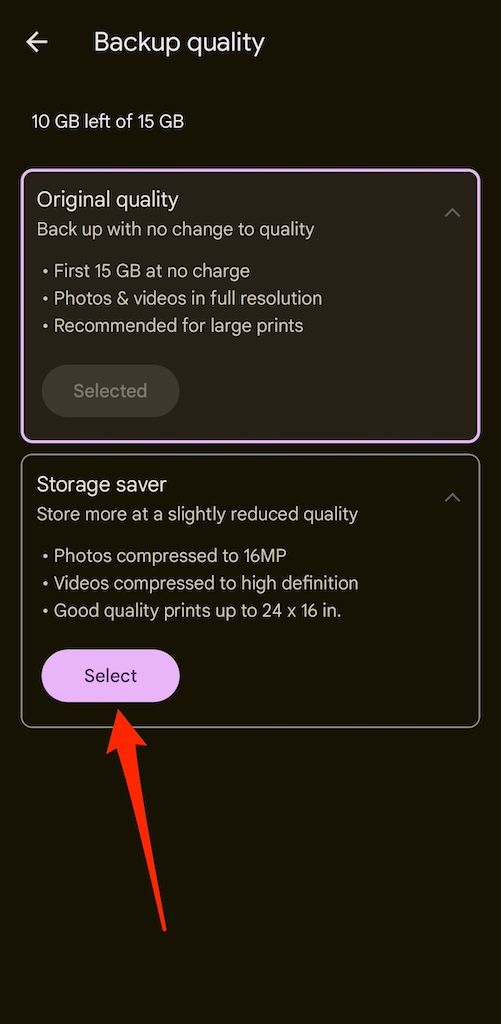
Google Photos discontinued free unlimited cloud storage in 2021. You may need to reduce the size of your pictures before uploading them to conserve space. You don’t need a third-party app for this method. It exists in-app and doesn’t reduce image quality. Quality loss only becomes noticeable when you enlarge images. Here’s how to compress them in Google Photos:
- Open the Photos app and tap your profile picture in the upper-right corner.
- Tap Photos settings.
- Select Backup.
- Scroll down and tap Backup quality.
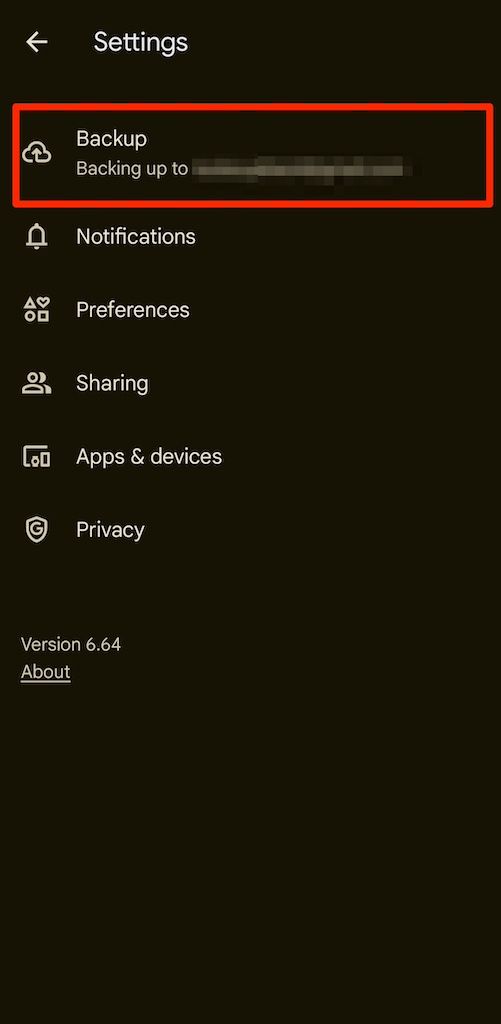
- Select Storage Saver.
Use Google Photos’ smart search bar
Photos’ search bar recognizes similar faces, landmarks, Wi-Fi passwords, phone numbers, hiking trips, and more. It’s a feature best explored on your own, but here are some examples of how to use it:
- If you took a picture of your router’s password sticker, search the phrase “Wi-Fi password” to display the photo.
- If you took pictures at a wedding, type “wedding” in the search bar to organize those photos.
- If you took photos while walking in nature, type “hiking” to view those images. It’s smart enough to exclude photos with buildings present.
- If you have several photos of boats and want to find a specific type of vessel, search for “ferry” to see the ferries in your gallery.
It’s not as intelligent as we sometimes like and can get confusing when including multiple-word queries. However, it’s a fantastic feature that can save hours of scrolling when you learn its quirks. You can even search by date to find old pictures. Or, if you own one of the Google Pixel 9 series, you can pair Pixel Screenshots with Google Photos to organize and find on-device screenshots with Google Gemini.
Related
Google Photos: How to search by date to find old pictures
The search field can use a standard date format to restrict its results
View generative AI photos in your collection
You can keep your photos organized by looking at the metadata below a photo. Eventually, you can manually view generative AI photo edits using metadata. This move by Google is to improve transparency between original photos and photos made with AI or AI editing features. With features like Magic Editor and Magic Eraser being integrated into Photos, it will become easier to sort out what’s real versus not with the AI Info tag.
Use Google Lens on existing photos
The basic search box has some powerful AI behind it, but Google Lens is where it shines. Use it to extract details from images and perform smart actions based on the identified content. You can also use it to translate text, identify plants and animals, shop for clothing, copy text to your computer, solve equations, identify board game parts, and more.
For example, Lens can copy texts from one device to another. Let’s say you have an image with text on your phone. The feature allows you to copy the text and send it to a connected computer. Press Ctrl or Command + V on your keyboard to paste the copied text into any open document.
Use collages, animations, and video highlights
Use the Google Photos app to edit your photos or videos into something more substantial than an album. The Collage feature lets you combine a maximum of six images into one. Meanwhile, Animation creates a GIF of up to 50 images.
There used to be a Movie option, but Google replaced it in October 2023 with Highlight video. While both features let you create video clips automatically, Highlight Video gives you more control over editing the music, clip order, and video length or style.
Here’s how to use the Animation and Highlight video features.
Use Animation in Google Photos
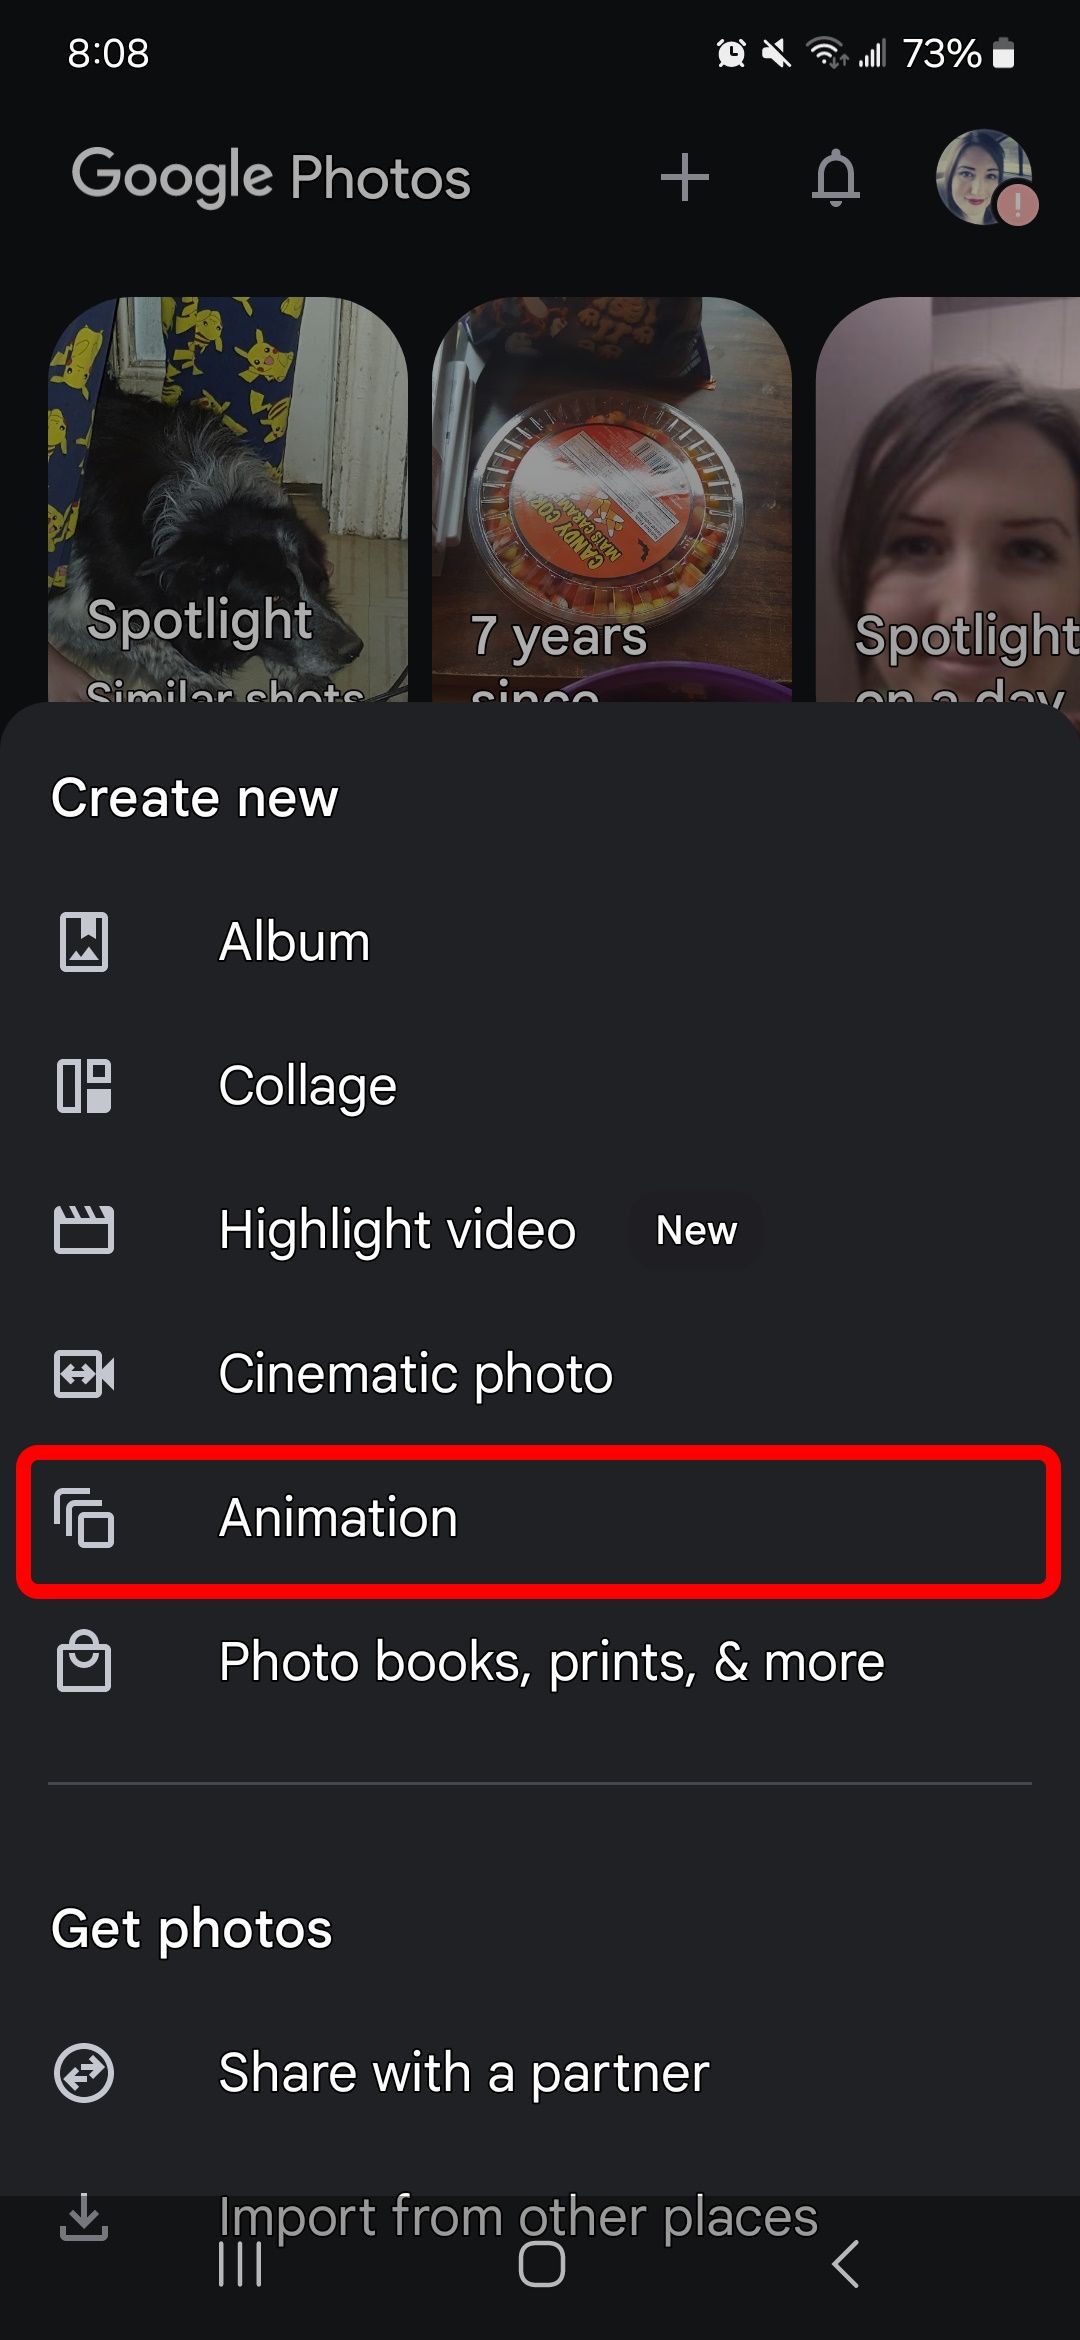
- Tap the Plus sign icon at the top.
- Select Animation.
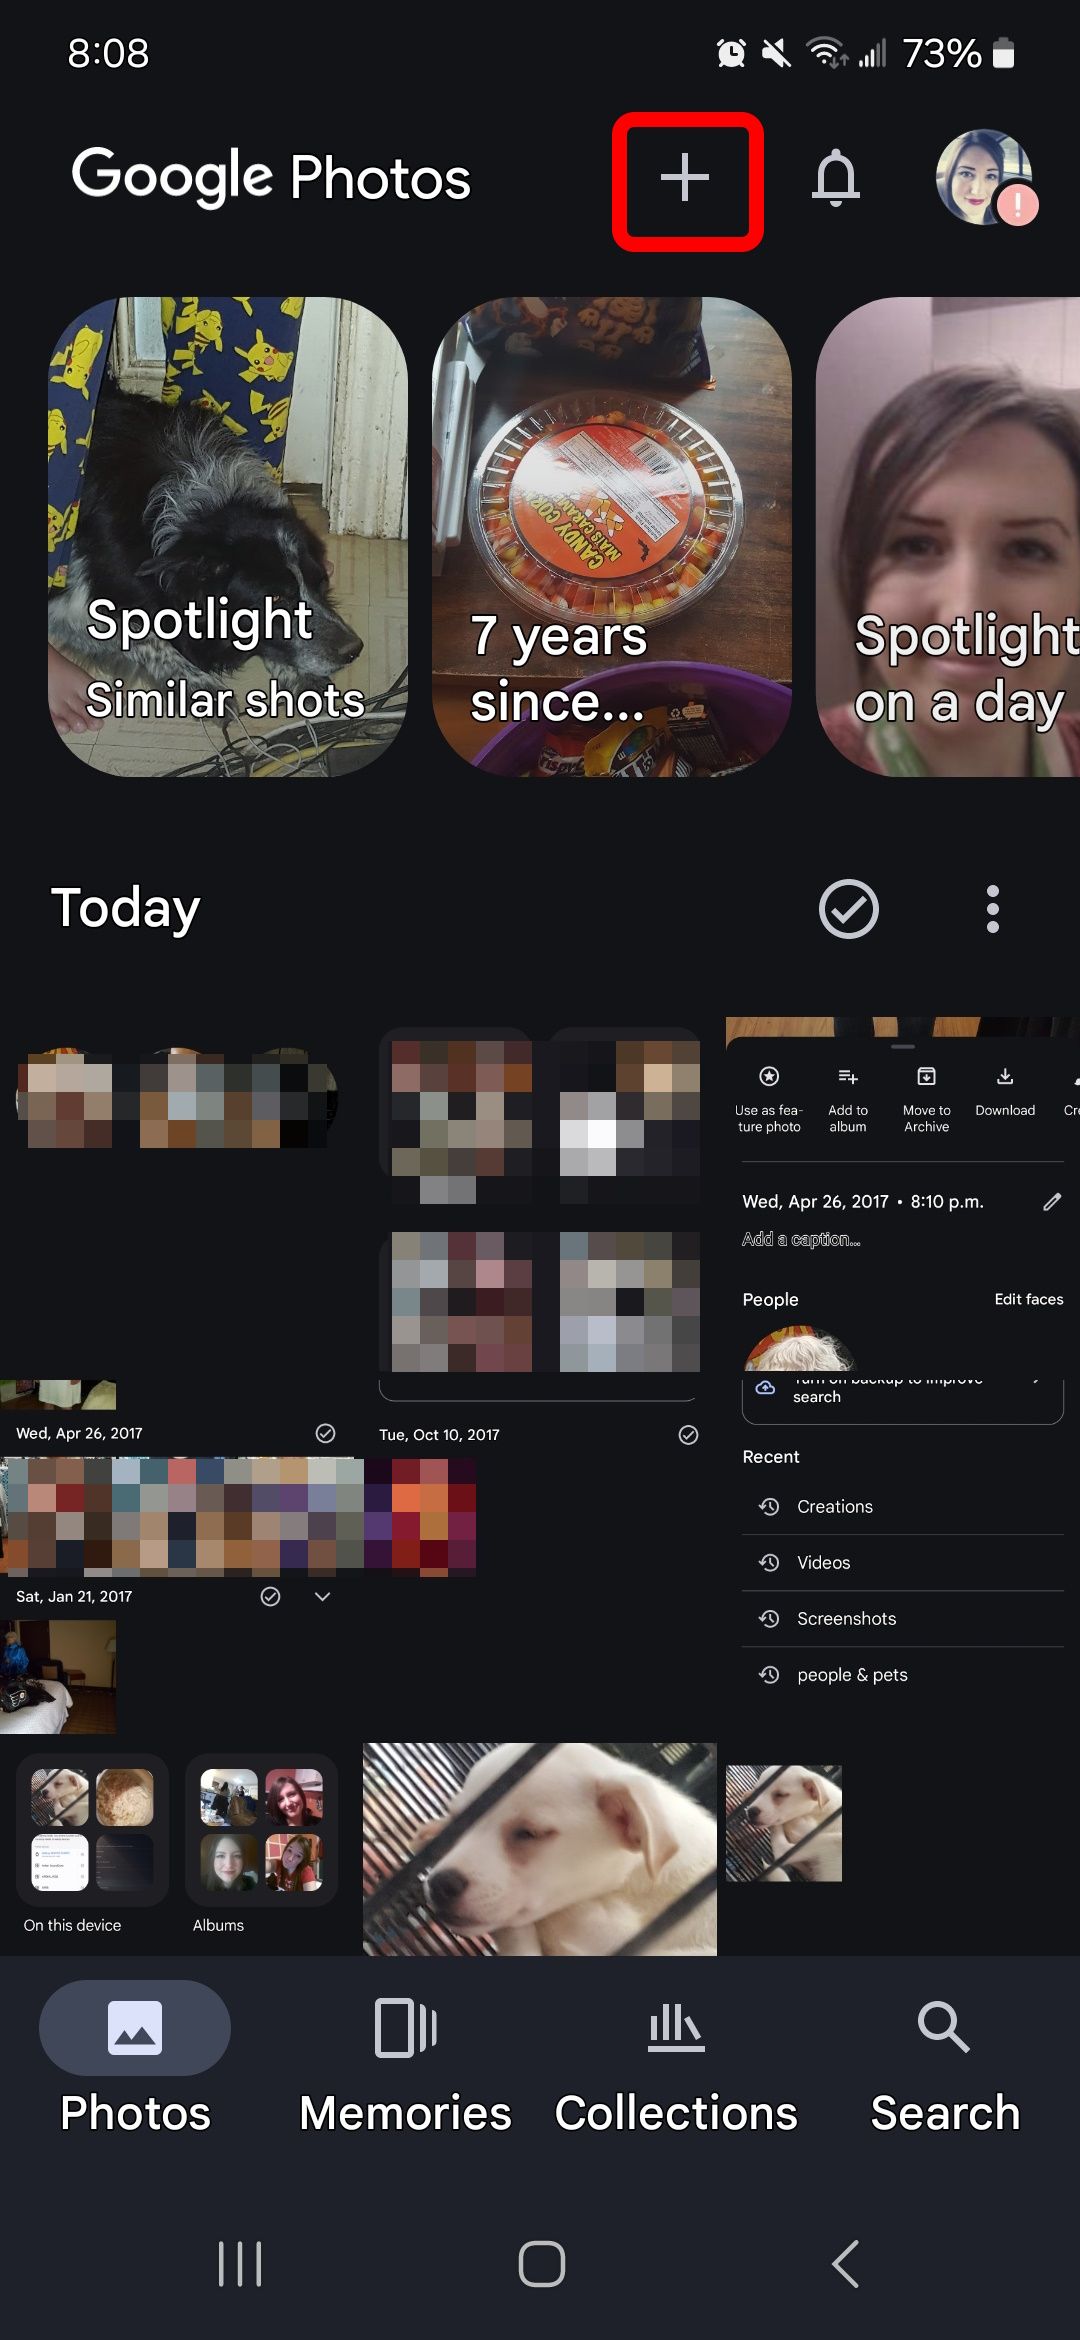
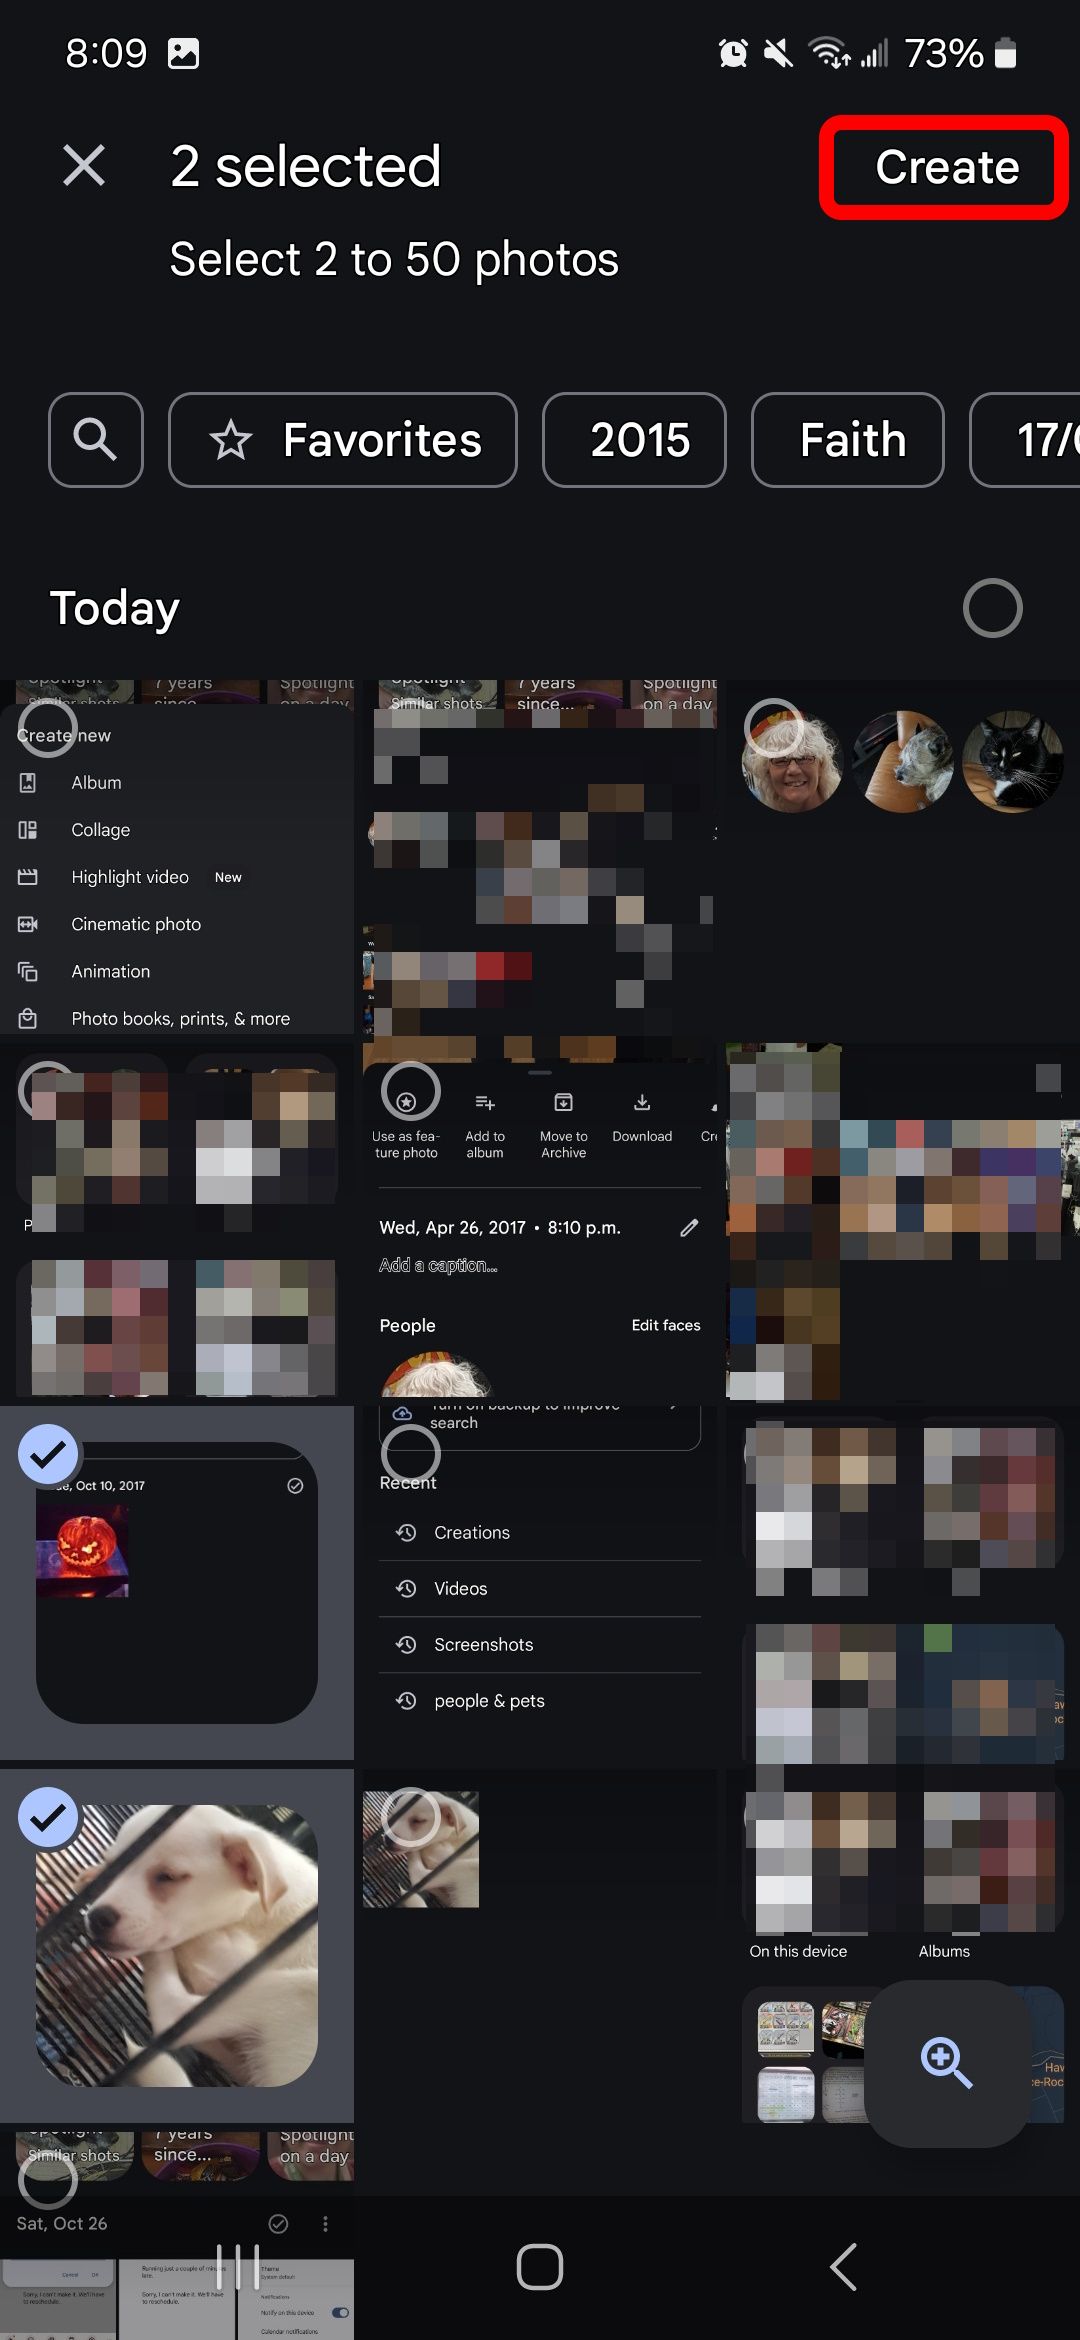
- Select your preferred images.
- Tap Create in the upper-right corner. Your GIF is ready in seconds.
Use Highlight video in Google Photos
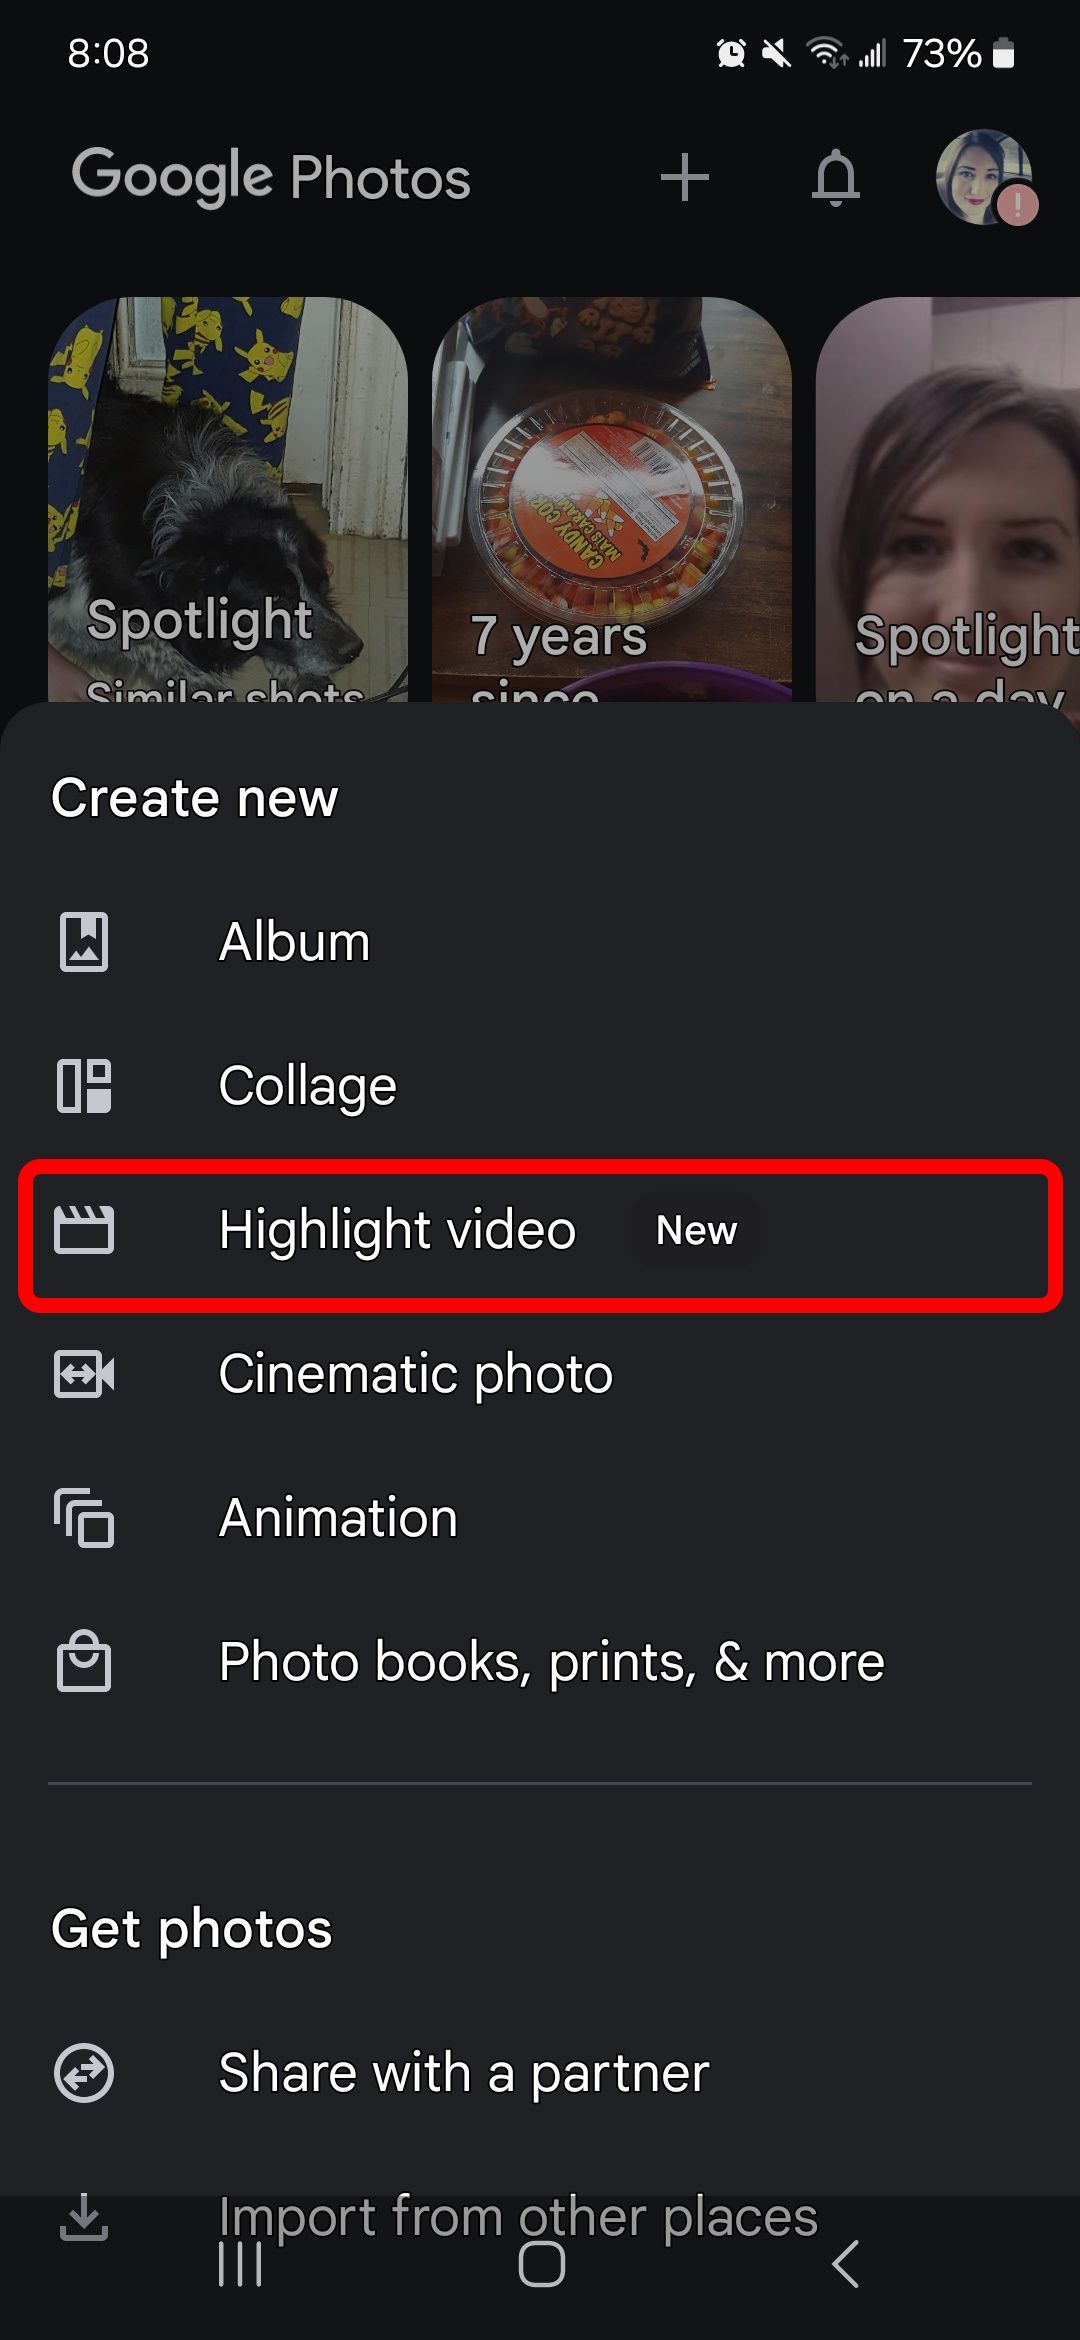
- Tap the Plus sign icon at the top.
- Select Highlight video.

- Search for a keyword. For example, “Food.”
- Select one or multiple suggestions. Then tap Preview in the upper-right corner.
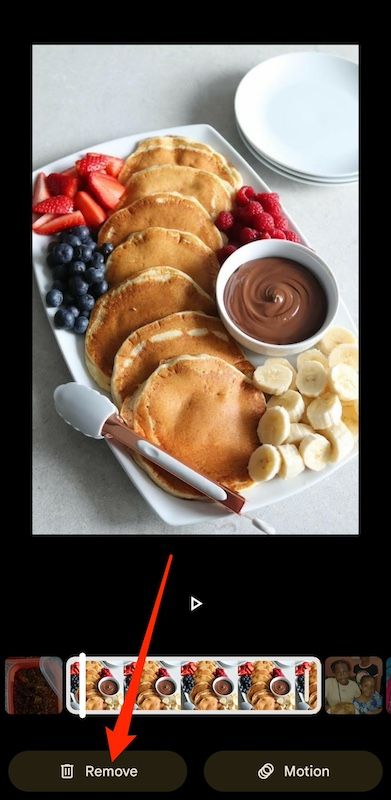
- The app automatically selects images or videos related to your keyword. Tap them and select Remove if you don’t want them.
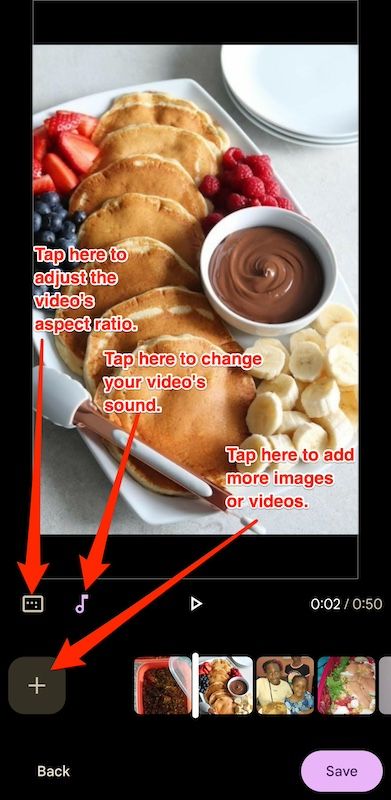
- Tap + to add more images or videos.
- Tap the music icon to insert sound from your device or choose from the app’s selections. You can also remove sound.
- Tap the square with dots to change your Highlight video’s aspect ratio.
- Tap Save in the lower-right corner.
To find your creations, go to the Search tab. Then scroll down and tap Saved creations.
Share albums with loved ones
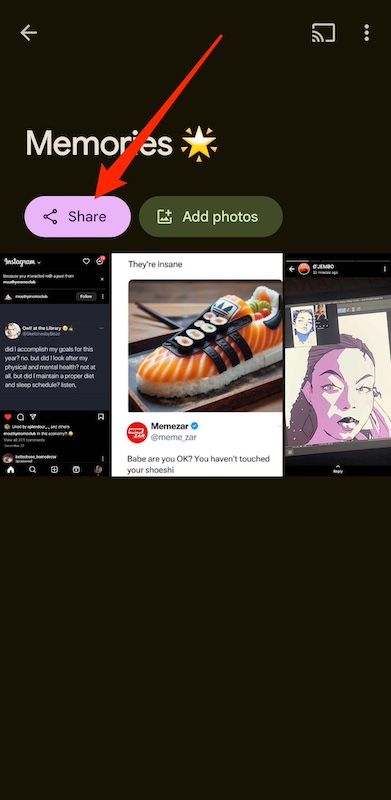
Sharing albums is an ideal way to create a memory bank. You and your loved ones can collectively build and contribute to it or hold conversations in the comment section. Here’s how to set it up:
- Open the Photos app.
- Go to Collections and select an album.
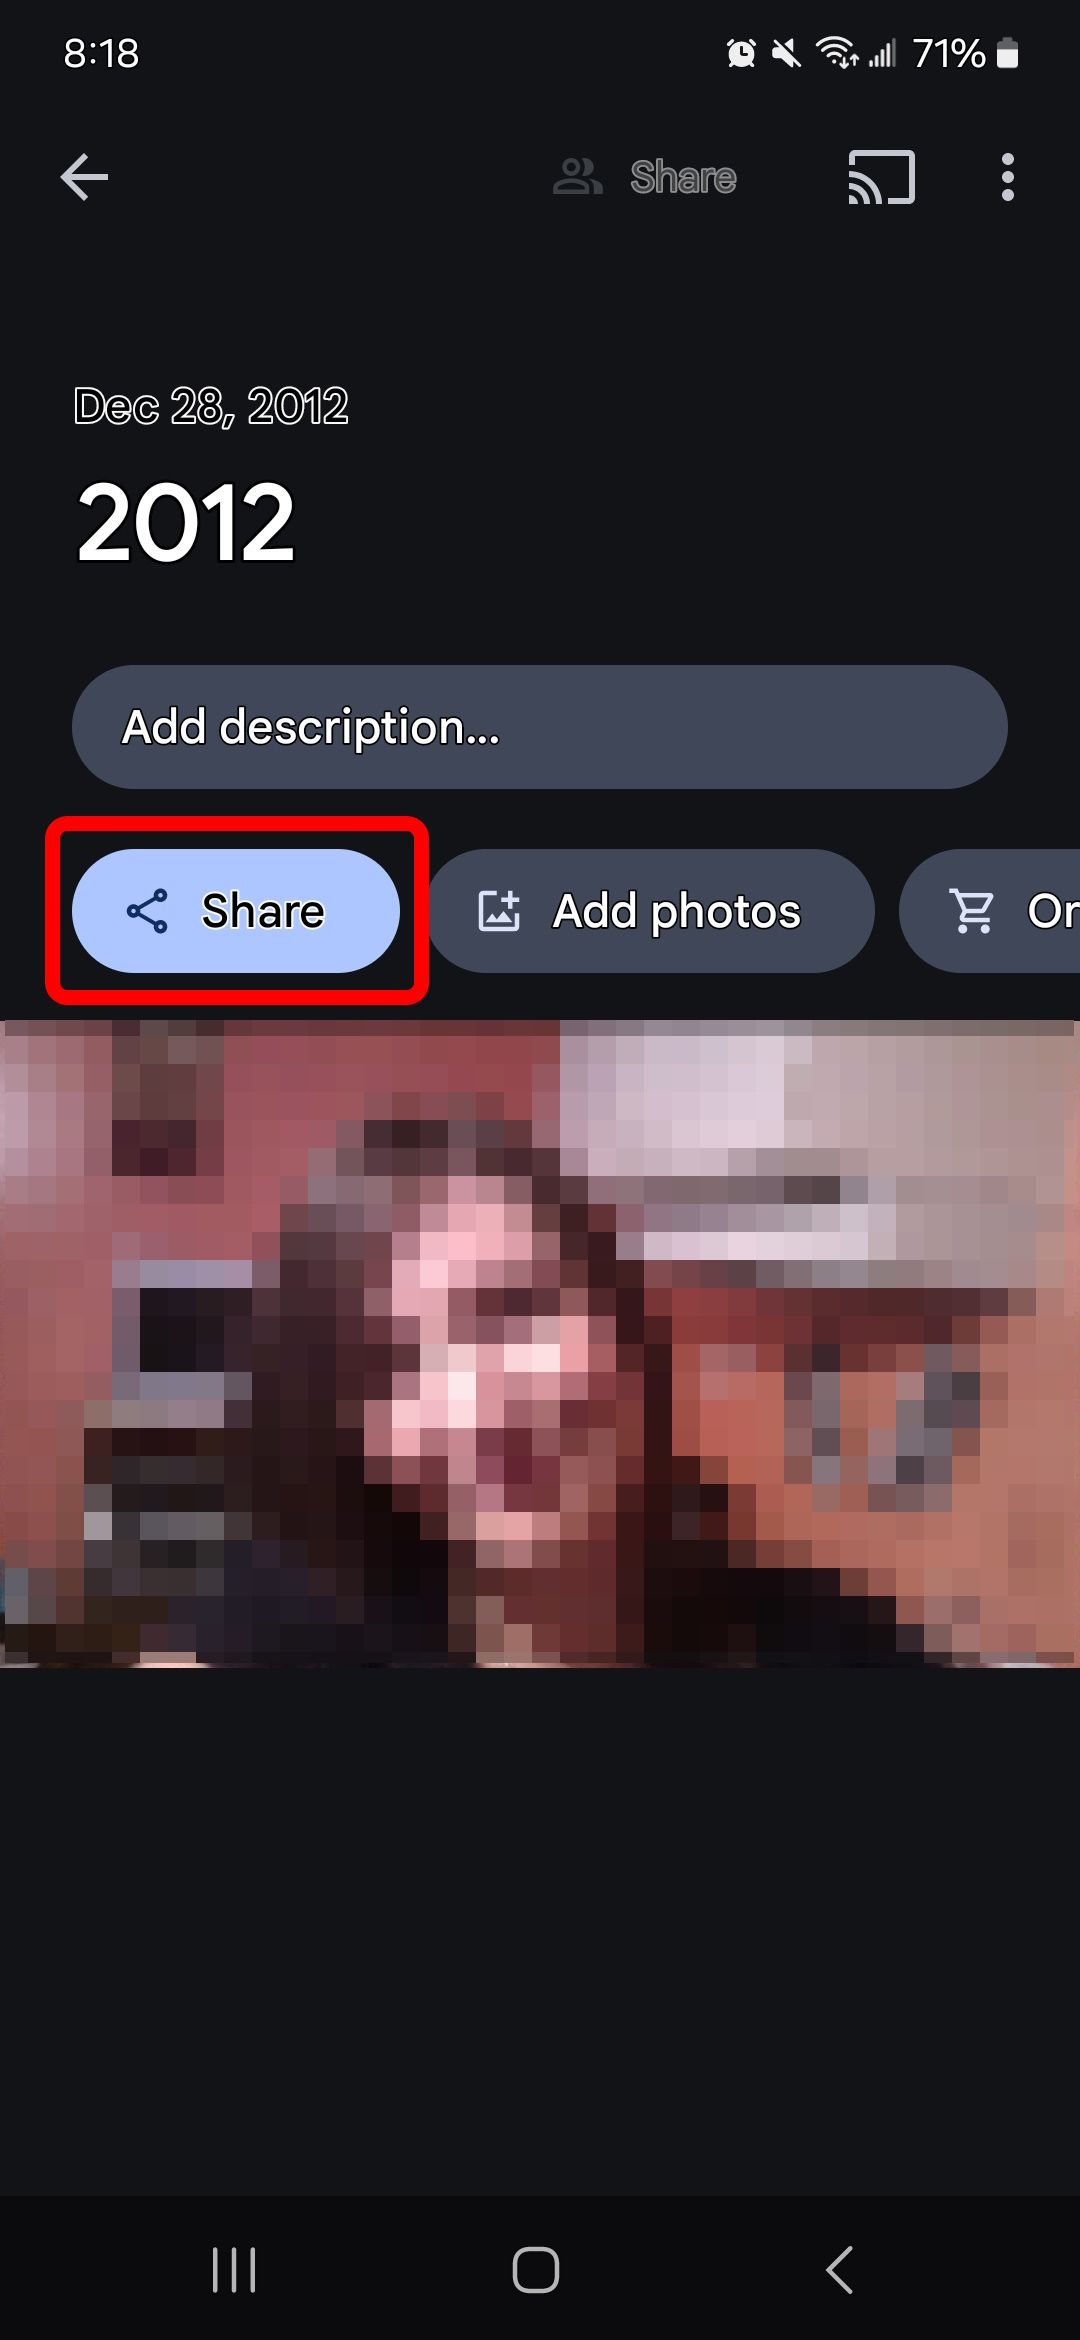
- Tap Share to copy or send the album link to other apps and invite specific people.
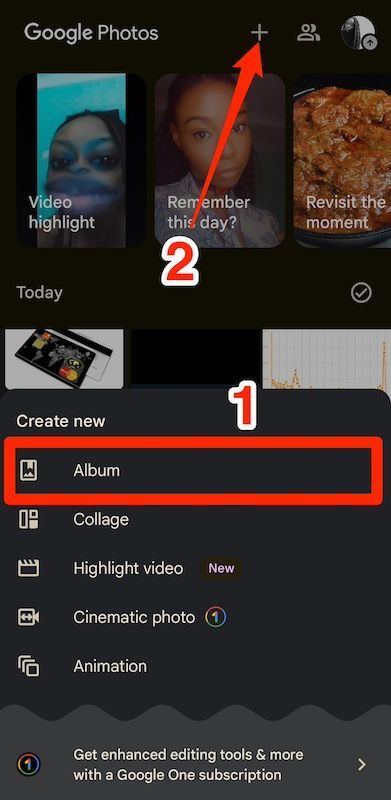
- Return to the Photos menu and tap the Plus sign icon at the top of the screen if you don’t have any albums.
- Select Album to create a new one.
- Give your album a name and add photos or videos to it.
- Tap Share to copy or send the album link to other apps and invite specific people.
Create a locked folder for private viewing
Google Photos’ locked folder feature helps you hide personal photos. You can only open the folder with your device’s security method. If you use a pattern to unlock your phone, that’s what you’ll use to access your private folder. Also, you can’t take screenshots of photos within it.
There are a few essential things to know before moving files into your locked folder:
- Photos aren’t backed up. They’re gone for good if you change or lose your device.
- Images are lost if you uninstall the Google Photos app.
- Anyone who knows how to unlock your phone can access your private photos.
- Other apps cannot access photos in the locked folder.
Google Photos is not your average gallery app
Google Photos is more than a simple gallery app. You can access advanced searching, improved AI tagging features, and even access Magic Editor to edit photos using generative AI for assistance. Google is committed to allowing the Photos app to grow, especially with AI. But for now, you can dabble with other tools for photo editing, such as annotations, blurry image fixes, and photo enhancements.
